


You can stream from as many locations as you want; however only a single DJ can be connected to a SHOUTcast server at once.
Navigation
FAQ Overview
Using SHOUTcast
With one account, can I stream from different computers?
Author: Bryan
Last update: 2013-07-17 12:50
What's my User ID or Stream ID?
The SHOUTcast v1 protocol doesn't use either, if your software gives you the option to give a value you should leave them blank.
Author: Bryan
Last update: 2011-05-17 18:18
How can I and others listen to my station?
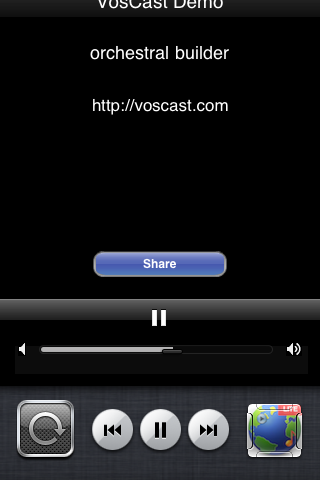
Use VosCast's browser based flash player
You can find our flash player on your quick listen page (example). You can use our Javascript code to embed this on your own site.
Use a 3rd party flash player
Many SHOUTcast powered stations use players such as JW Player to play their station on their sites. JW Player offers a higher level of customisation than our own player.
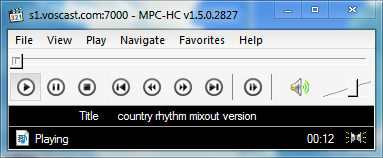
Listen in a desktop media player
You can embed our playlist file links using our Javascript code on your page, or just copy the hyperlinks and use your own icons or text. We offer 4 different playlist formats that will play in the vast majority of desktop media players such as:
Windows Media Player

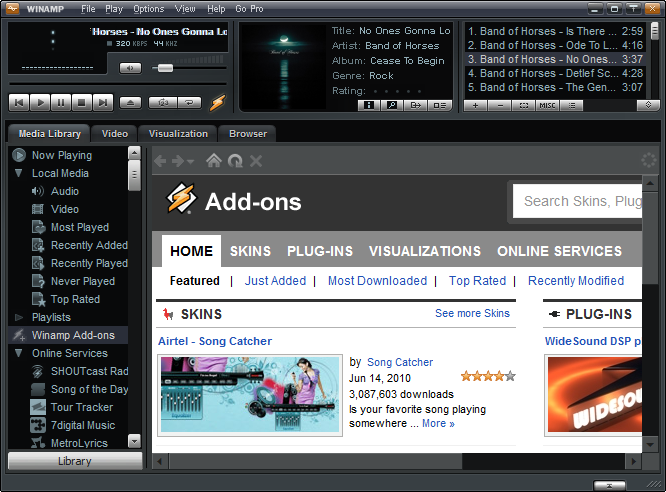
Winamp
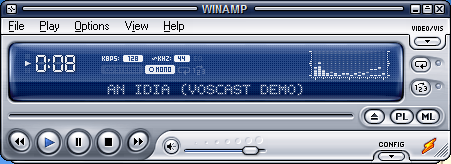
VLC
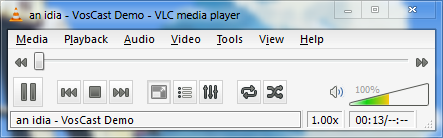
Media Player Classic
Author: Bryan
Last update: 2013-07-17 12:49
How do I get listed in the SHOUTcast directory?
You need to be streaming for normally around 30 minutes before SHOUTcast will list you in their directory although it can take longer and can be near instant.
Your server must have a customised server title and genre to be listed. If you do not change your title from the default "Unnamed Server" (or similar), then the directory will not list you.
If you have trouble getting listed, you can check your SHOUTcast trailing log file. You will see something similar to the following on a sucessful connection to the directory:
<05/18/11@01:13:31> [source] connected from 95.172.2.170
<05/18/11@01:13:31> [source] icy-name:VosCast Demo ; icy-genre:Assorted
<05/18/11@01:13:31> [source] icy-pub:1 ; icy-br:128 ; icy-url:http://voscast.com
<05/18/11@01:13:31> [source] icy-irc:N/A ; icy-icq:N/A ; icy-aim:N/A
<05/18/11@01:13:33> [dest: 64.12.243.204] starting stream (UID: 672)[L: 1]{A: SHOUTcast Directory Tester}(P: 1)
<05/18/11@01:13:33> [dest: 64.12.243.204] connection closed (0 seconds) (UID: 672)[L: 0]{Bytes: 12911}(P: 1)
<05/18/11@01:13:33> [yp_add] yp.shoutcast.com added me successfully
Author: Bryan
Last update: 2013-07-17 12:48
What's my username and password for the admin section of my server?
Your username is "admin", you can find the password in the client area in the SHOUTcast Server Settings page under "Administrator Password".
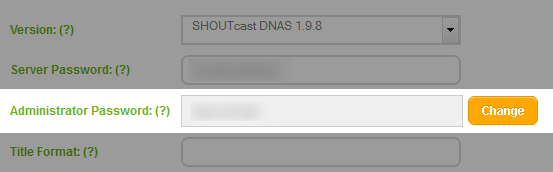
For our administration purposes, we require this password to be randomly generated.
Author: Bryan
Last update: 2013-07-17 12:45
Why is there a delay between audio send to the server and what heard by listeners?
SHOUTcast buffers around 15 to 45 seconds worth of audio on the server to keep the stream consistent and for quality gains. Without the buffer, the quality of audio would be significantly worse with poorer sound quality, gaps and audio glitches.
This behaviour is built into SHOUTcast and can’t easily be removed, nor would it be sensible to attempt to remove it. Higher bitrate plans will have slightly lower delays as the buffer will fill up quicker. This is the only way to lower the delay caused by the buffer.
Author: Bryan
Last update: 2011-09-07 01:01
Will I need to leave my computer on?
If you plan on streaming audio to the SHOUTcast server yourself, then yes. For as long as you want the server to be broadcasting, you will need to provide the audio live for it to broadcast.
However our Auto DJ doesn't require you to connect yourself, as the Auto DJ will connect and stream on your behalf. You will simply need to upload audio in the form of MP3s in the client area and enable the Auto DJ. It will play the MP3s you've uploaded and you'll be free to use your computer as you like.
Author: Bryan
Last update: 2012-01-12 23:59
What does "Server Status: Server is currently down." mean?
SHOUTcast servers running SHOUTcast 1.9.8 will display “Server Status: Server is currently down.” when no DJ is connected and streaming audio. Contrary to what the message would imply, the server is in fact online or “up” and ready to accept a connection from a DJ.
If a server is offline, the status page simply will not load. In this case, it's possible routine maintenance work is being performed or may indicate a more serious problem. In the event of such downtime, we strive to post updates on our facebook page.
If the server is online and a DJ is broadcasting, the status will read as “Server Status: Server is currently up and public.”
Author: Bryan
Last update: 2012-01-13 00:10
Auto DJ
How much space is there on the Auto DJ?
- The total file size of all files combined is unlimited.
- The total number of files you can upload is unlimited.
- The largest single file that can be uploaded is 150mb.
Author: Bryan
Last update: 2011-05-17 18:19
What kind of files can I upload to the Auto DJ?
Currently the Auto DJ only accepts .mp3 files.
Author: Bryan
Last update: 2011-05-17 18:19
Why do some song titles display blank or as "unknown" or get stuck on a previous song?
There can be two causes for this problem:
The server password contains special characters.
A bug in sc_trans, the software that powers the Auto DJ means that any server passwords containing special characters will cause problems displaying and updating metadata. A workaround, is to only use alphanumeric characters in your password.
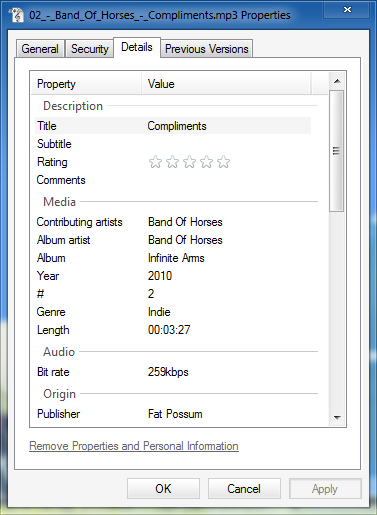
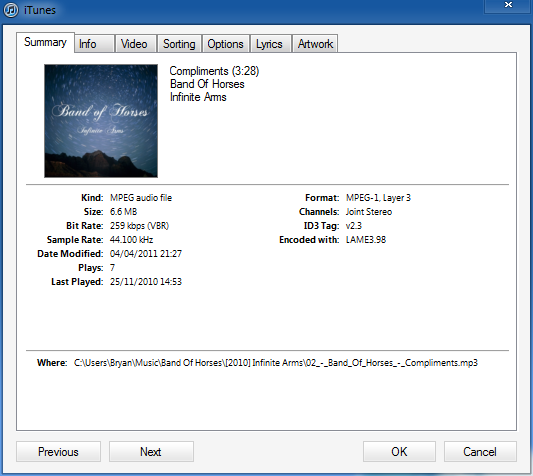
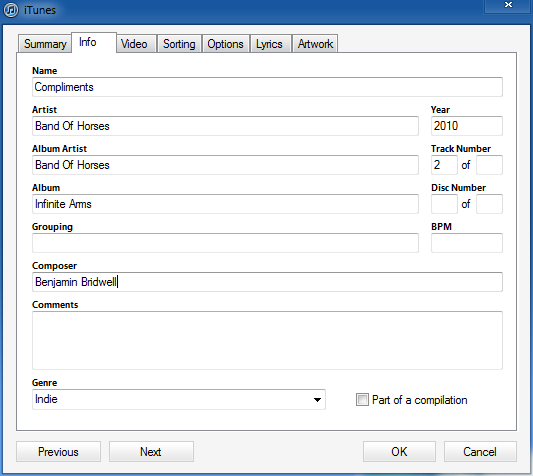
MP3s affected have invalid, corrupt or missing ID3 tags.
You can edit the ID3 tags of MP3s in Windows 7 or some media players like iTunes. The Auto DJ will read the track title from "Title" ("Name" in iTunes), the artist from "Contributing artsts" (sometimes displayed as "Artists"), and album from "Album".
The Auto DJ also has some limitations in the types of MP3s that it can read:
There is support for ID3v1 and ID3v2 tags. With ID3v2 there is support of version 3 and 4 of the specification though there are the following limitations:
- Unsynch data is not supported
- Compressed frames are not supported
- Encrypted frames are not supported
- Appended v4 frames are not supported
Source: http://wiki.winamp.com/wiki/SHOUTcast_DNAS_Transcoder_2#MP3_Files
For most people, you won't need to be concerned about these limitations as most media players and tag editors will write the ID3 tags in formats that can be read by the Auto DJ.
Author: Bryan
Last update: 2011-08-18 19:50
Getting started with the Auto DJ
Introduction
VosCast provides a free Auto DJ service with each server that it provides. The Auto DJ is considered as a seperate feature and has its own terms of service.
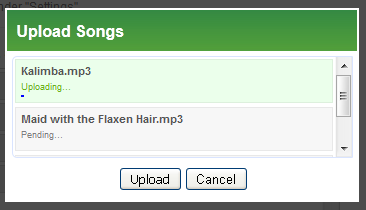
Uploading songs
Playlists and Schedules
By default, the Auto DJ will play all items uploaded to the Auto DJ in a continuousloop in the order on the Manage Music page until manually stopped. You can fine tune this by creating playlists and schedules.
Creating a playlist
MP3s can be placed into one or multiple playlists. You can then use this playlists in the scheduler. To create a new playlist:
- Navigate to the playlists page
- Click the orange New button
- Enter a name for the playlist. This name for your convenienceand won't be shown to listeners.
- Select the newly created playlist from the list of all playlists
- Use the green arrows to copy MP3s into the playlist

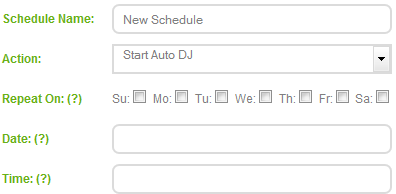
Creating new schedules
The scheduler can perform three tasks at times you set:
- Start the Auto DJ.
- Stop the Auto DJ.
- Play a playlist.
You can set each task to repeat on any combination of days, or one off on a specific date. The Auto DJ uses Mountain Standard Time (MST) and observes day light savings time. To calculate the time difference between MST and your timezone, you can use services such as Wolfram Alpha.
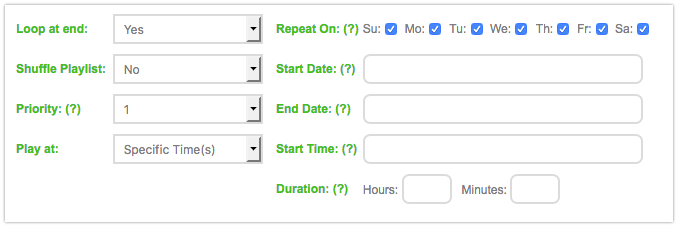
When setting a playlist to run, there are a number of other options to consider:
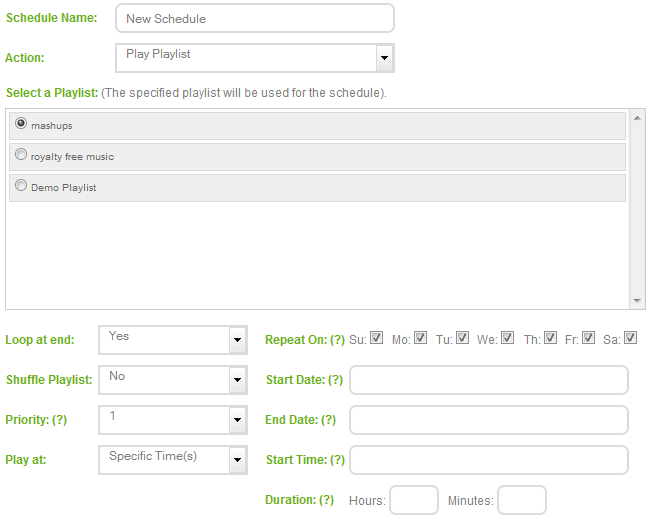
Loop at end: Specify if the playlist will restart if the end of the playlist is reached before the duration of the event is completely fulfilled.
Shuffle Playlist: Specify if the playlist should be shuffled when being played.
Priority: Specify the priority of the playlist when a playlist event overlaps with that of another event. 1 is the lowest priority, 9 is the highest.
Please note: Playlist events are queued up instead of being activated immediately so if you have a 'jingle' playlist then this would not be played until the currently playing file has completed playing and has not been pushed down the queue by a higher priority playlist event. This is something you need to take into account if you want to have a jingle play every 10 minutes but none of the files have a roughly standard duration.
Author: Bryan
Last update: 2020-10-28 20:58
What timezone does the Auto DJ use?
The Auto DJ uses Mountain Standard Time (MST) and observes day light savings time. To calculate the time difference between MST and your timezone, you can use services such as Wolfram Alpha.
Author: Bryan
Last update: 2012-04-05 18:57
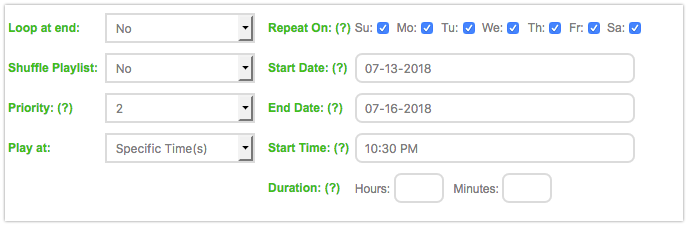
Keep Auto DJ from Playing All Your Files
The Auto DJ was designed to fall back to the “Manage Music” list when a schedule is not played. This behavior is fine for the majority of stations, but some prefer for the audio files in their playlists to ONLY play at their scheduled times.
There is a work-around for this, and it isn’t perfect, but it will allow you to avoid having your playlist audio files playing when they’re not scheduled.
1. Create a “Default” playlist.
This will be the playlist that you want to play when your other scheduled playlists are not playing. For example, this could be all of the files that are in your “Manage Music” list, except for those which you are using in other playlists.
2. Create a playlist schedule for the “Default” playlist with:
a. “Loop at end” set to “Yes”.
b. “Priority” set to 1.
c. “Play at” set to “Specific times”.
d. the start date, end date, start time, and duration all blank.
These settings will have the “Default” playlist play as soon as possible (after one file which is 30 seconds or longer has played from the Auto DJ), and repeat continuously until a schedule with a higher priority is set to play.
3. Set your other schedules to have a higher priority.
You can set your other schedules to have a higher priority, like “2”, so that they are able to interrupt the “Default” schedule.
Author: Joseph D.
Last update: 2018-07-14 10:02
Getting Started
What equipment do I require to stream?
A modern computer running Windows, Mac OSX or Linux and a broadband connection.
You'll also need software to connect and stream to the SHOUTcast server. We recommend using Winamp with the SHOUTcast DSP plugin.
Author: Bryan
Last update: 2013-07-17 12:39
What do AIM, ICQ and IRC stand for and what do I put for them?
AIM - AOL Internet Messenger
ICQ - I See You
IRC - Internet Relay Chat
If you have an AIM or ICQ handle, or an IRC channel you can list them here and they will be displayed on your SHOUTcast server stats.
Author: Bryan
Last update: 2011-05-17 18:23
Getting Started with Winamp
1. Install Winamp.
For this tutorial, we are going to use Winamp. You can download Winamp from the Nullsoft Website.
Please note that while Winamp has a Mac OSX version, the required plugin does not. Winamp cannot be used to steam from OSX. For an alternative, please consider Nicecast.
2. Install the SHOUTcast DSP Plugin.
Now download and install (using the default settings) the SHOUTcast DSP Plugin. You can download this plugin here.
3. Enable the SHOUTcast DSP Plugin.
a. Launch Winamp.
b. Open "Preferences" (Options -> Preferences, or CTRL+P).
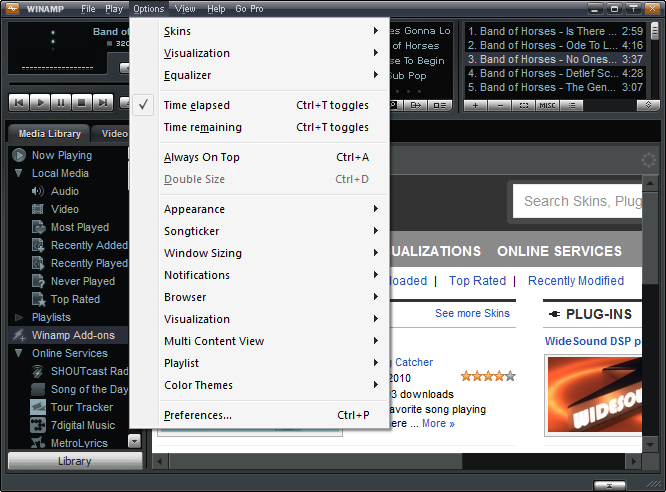
c. In the left menu, select "DSP/Effect". Then click (In the box on the right) "Nullsoft SHOUTcast Source DSP v2.3.3 [dsp_sc.dll]". Please note that the version shown will change as newer versions are released.
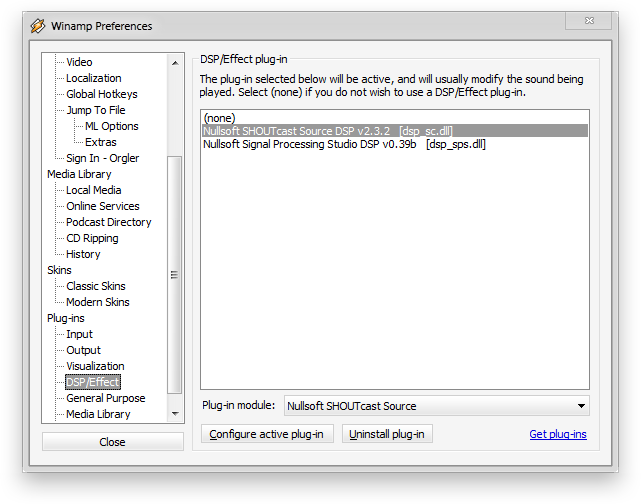
d. Close the Preferences window (Press "Close")
e. You should now have the Nullsoft SHOUTcast Source window running alongside Winamp. This will now automatically run every time you start Winamp.
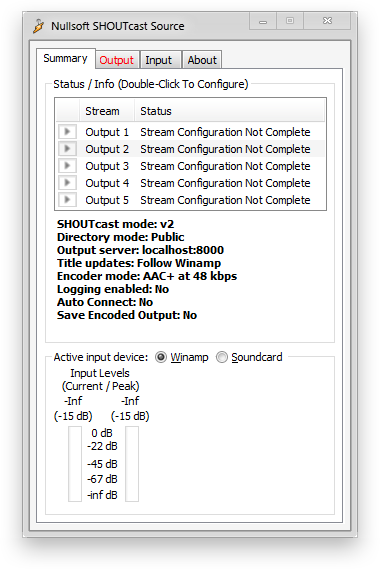
4. Configure SHOUTcast Source (The SHOUTcast Source Plugin).
The first settings you will need to modify are the connection settings.
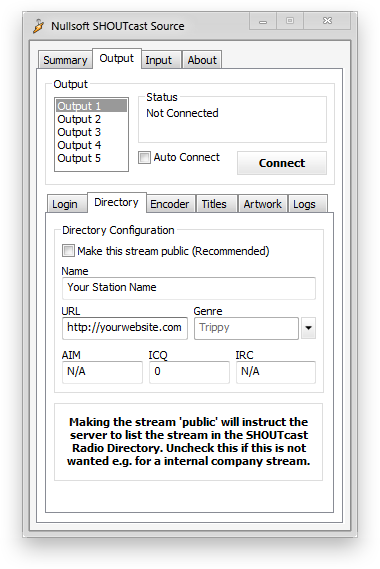
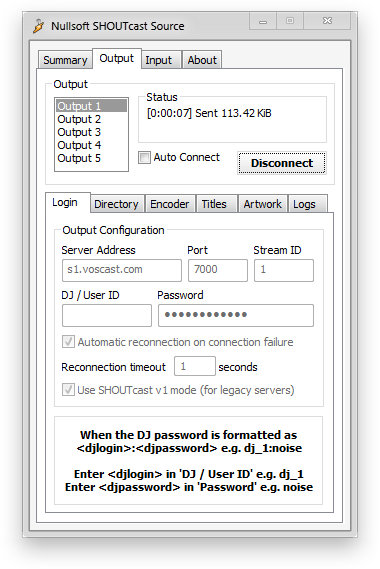
a. Select "Output" and then "Login".
b. Input your server Address, Port, and Password. (This information can be found within your VosCast control panel overview). Please review this information to ensure it has been entered correctly.
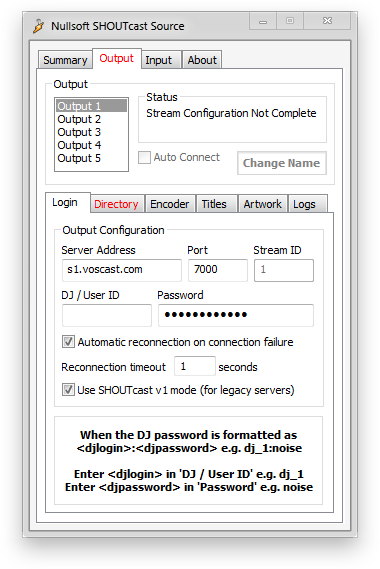
c. Select "Directory", and fill in the appropriate information. Set AIM, ICQ and IRC to N/A or 0 if you don't have either of them, or don't know what they are. Tick "Make this stream public (Recommended)" to be listed on the SHOUTcast directory.
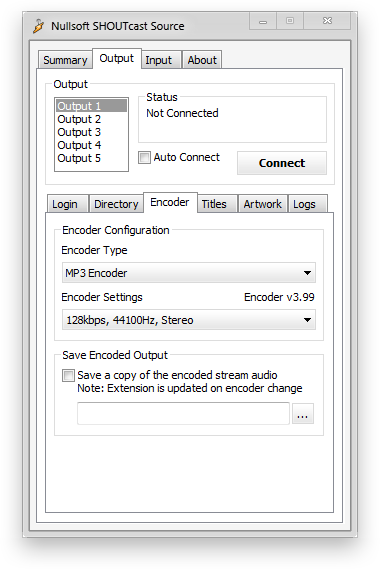
d. Select "Encoder", and select "MP3 Encoder" as the Encoder Type. For the Encoder Settings, match it to the plan you purchased with your VosCast account (the bitrate).
5. How to DJ.
a. Select "Input".
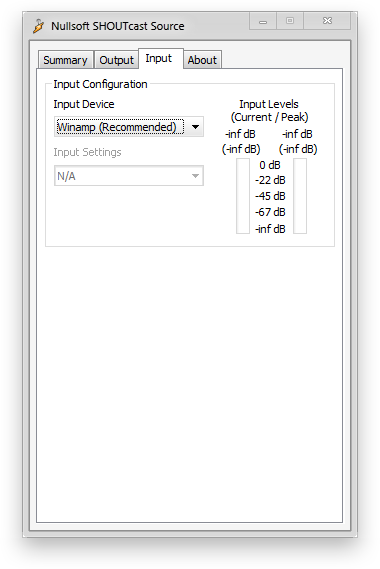
b. On this tab, you can select "Winamp (Recommended)" or "Soundcard Input" under the Input Device.
Having "Winamp (Recommended)" selected will stream the music you are presently playing in Winamp. Having "Soundcard Input" selected will stream audio from your microphone, or the input device you select.
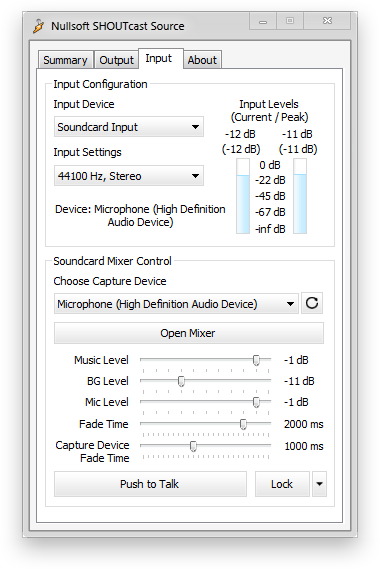
c. For streaming from your microphone, select "Soundcard Input". You should match the "Input Settings", to match the "Encoder Settings" you set earlier under the Output -> Encoder tab.
d. For broadcasting, to play music, switch the input device to "Winamp (Recommended)". When you want to talk, select "Soundcard Input". Switch the Input Device back to "Winamp (Recommended)" for the moment.
6. Start Broadcasting.
To connect, select "Output", and press the "Connect" button. You should now be streaming the music you presently have playing in Winamp.
Author: Dan Z
Last update: 2014-12-03 21:56
How long will it take to set up my SHOUTcast server?
As soon as you have paid, your order will be processed and your server will be set up instantly. You will receive a welcome email within a few minutes containing a confirmation of your order your server information and your login details.
Author: Bryan
Last update: 2011-05-17 18:22
Getting Started with SimpleCast
Author: Bryan
Last update: 2012-05-31 18:42
Getting Started with butt - broadcast using this tool
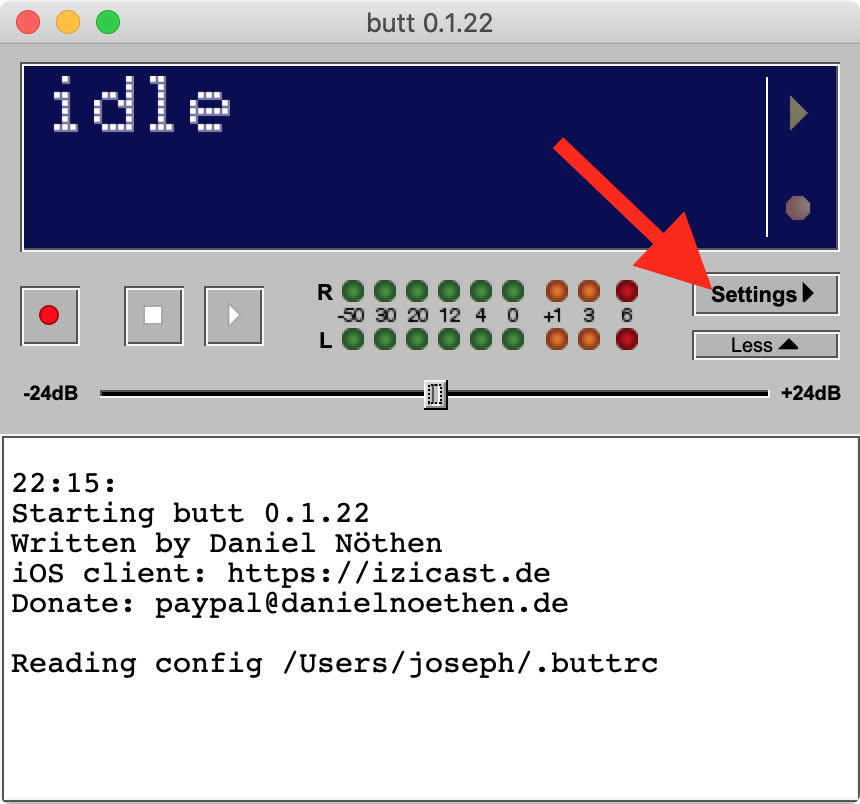
Install butt - broadcast using this tool
For this guide we'll be using butt. You can download butt from their website.
Configure butt
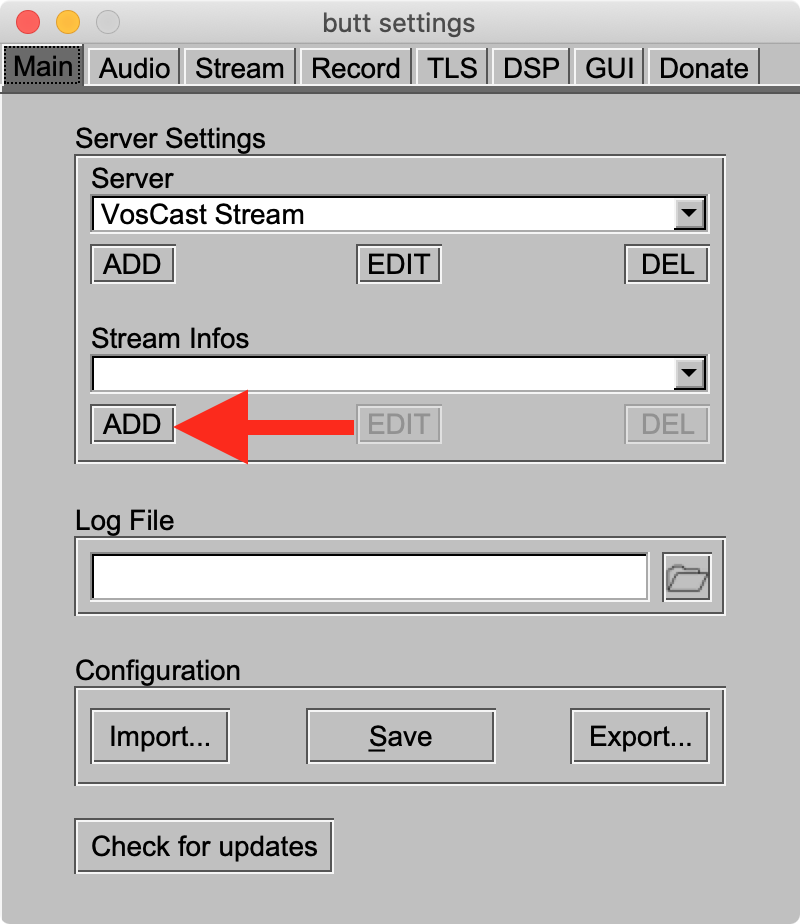
- Launch butt
- Click "Settings" to open the settings dialog
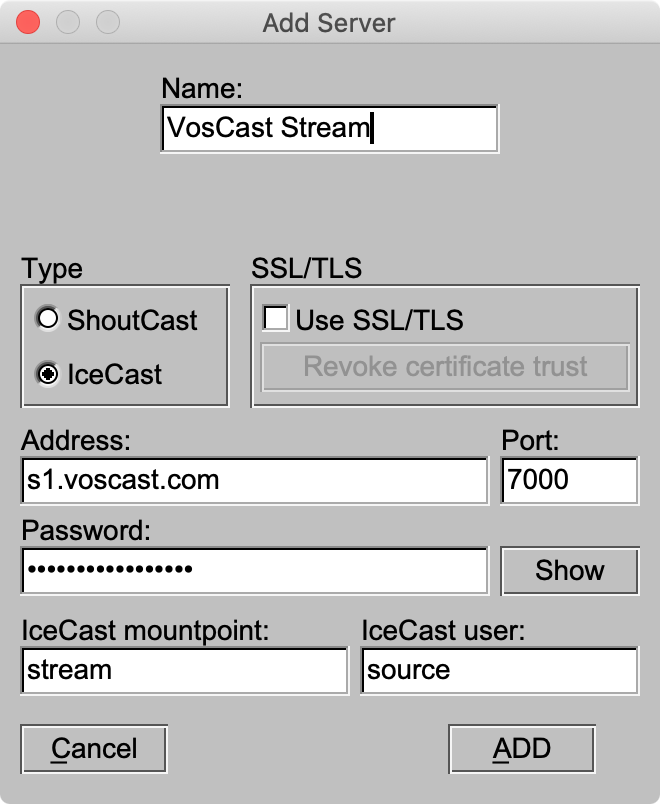
- Under the "Server" section, click the "Add" button.
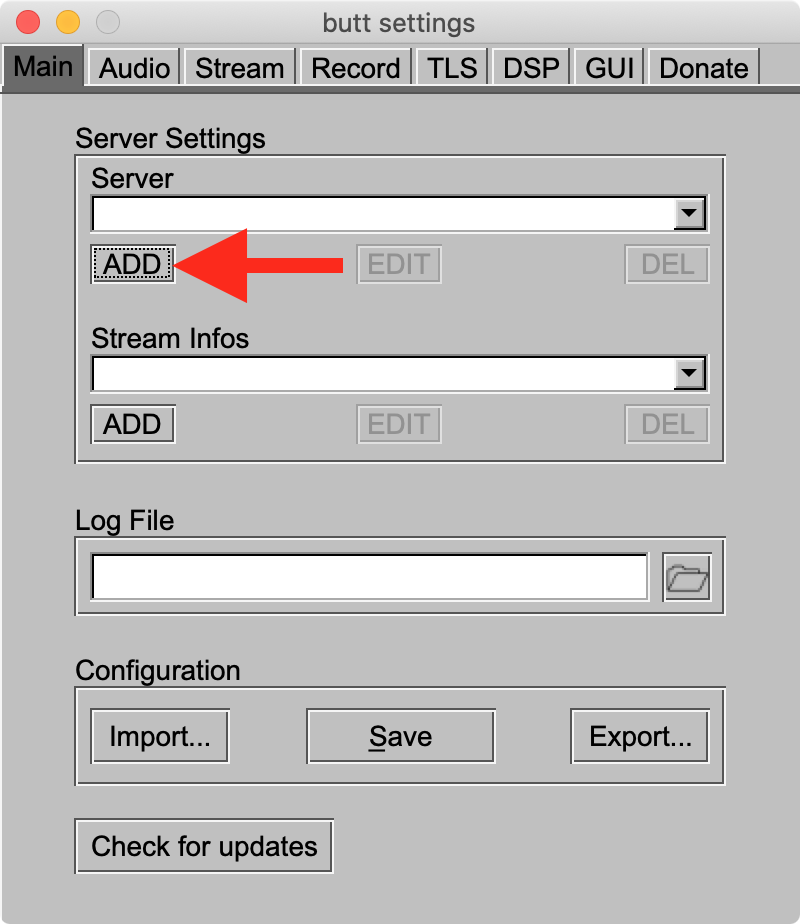
- Set the server type to Icecast and enter your server details. Enter your first “Server Port” into the “Port” box. For example, if your "Server Ports" section says "7000, 7001 (SSL)", you would enter 7000 as your port. When you're done, press "Add".
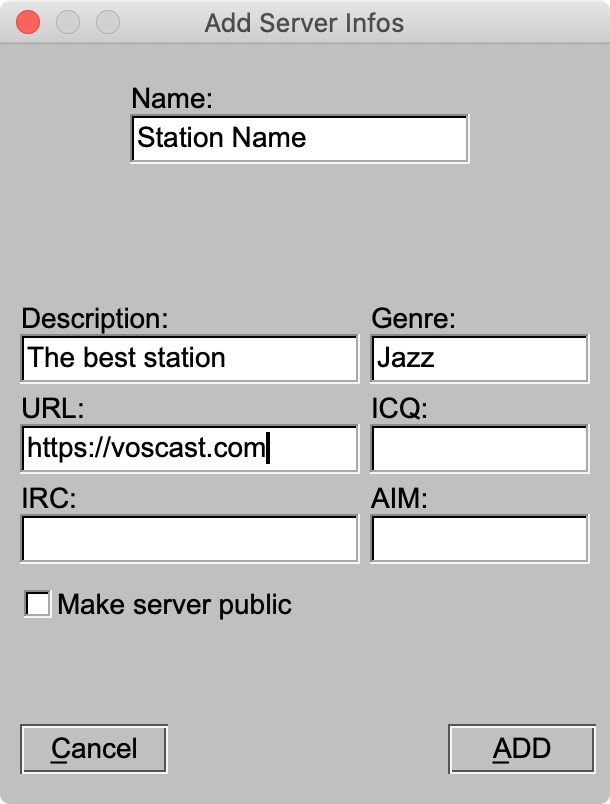
- Under the "Stream Infos" section, click the "Add" button.
- Enter your station name and details. When you're done, press "Add".
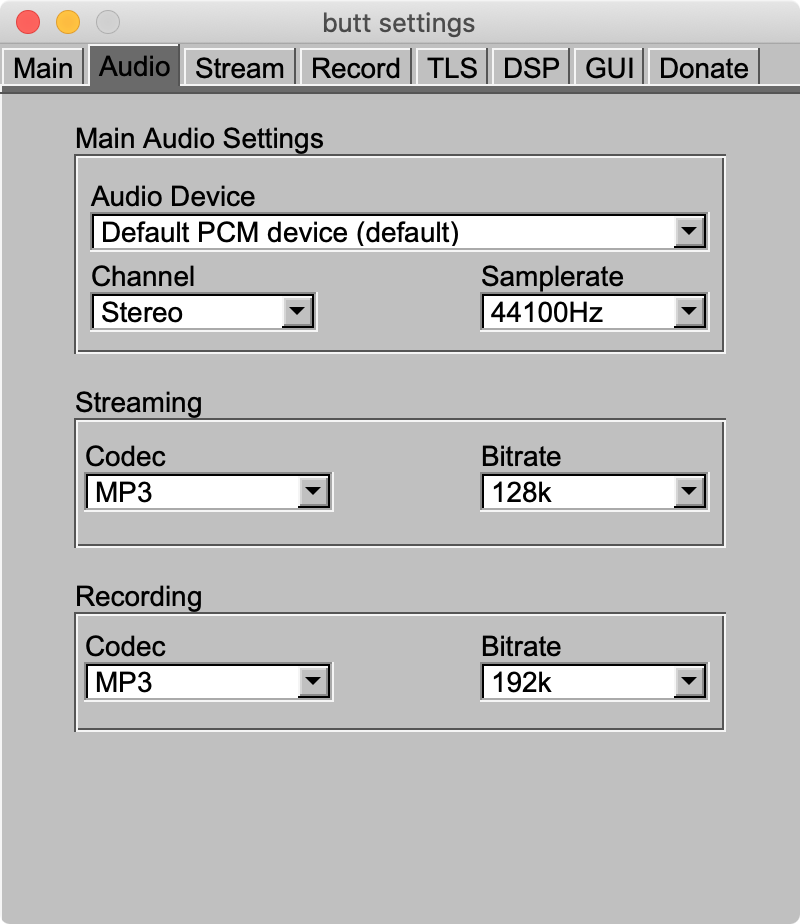
- Go to the "Audio" tab, select the audio device you want to stream, and set your bitrate. For most people, the default device is the device you should select.
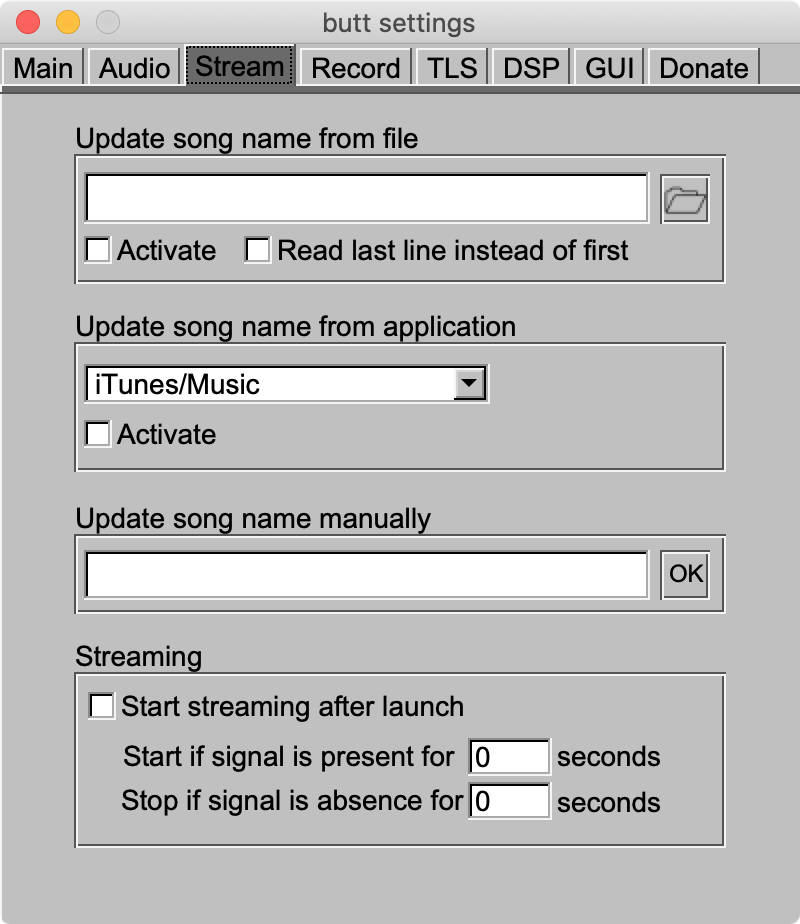
- Go to the "Stream" tab and choose how you want titles set. The option you choose will depend on what you're broadcasting, so choose the best option for your needs.
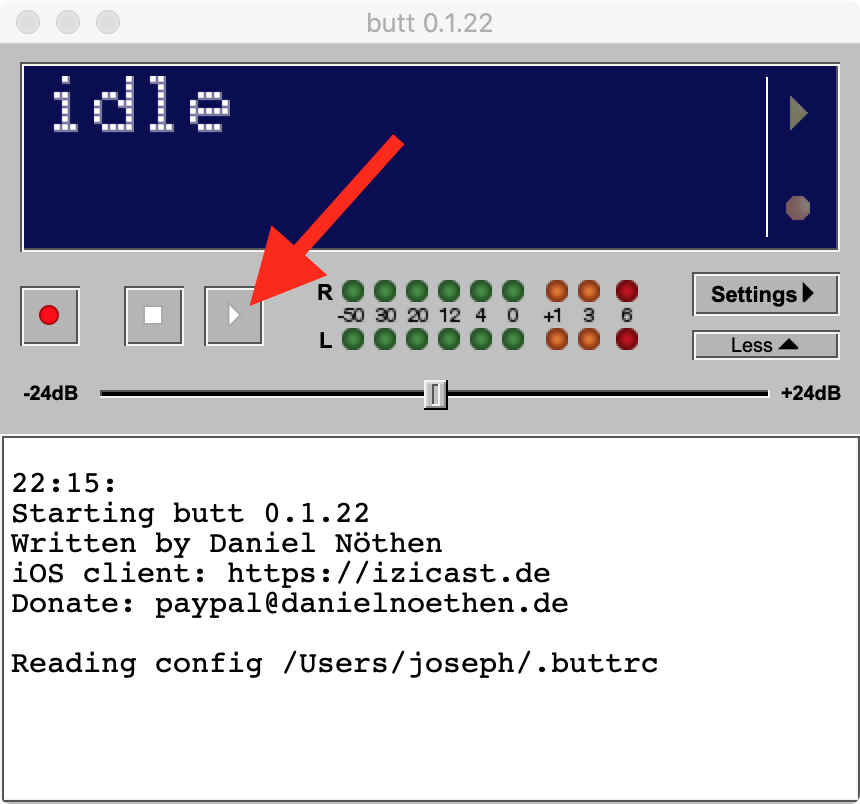
- Click the play button to begin broadcasting.
Author: Bryan
Last update: 2020-07-21 17:02
What software can I use to connect to my SHOUTcast server?
For a list of recommended cross-platform software, please visit our Getting Started - Basic Information guide.
Winamp with the Nullsoft SHOUTcast Source plugin
- Runs on Windows: Yes
- Runs on Mac OS X: No
- Runs on Linux: No, can be ran with Wine
- Price: Free
- Developer: Nullsoft
- Website: http://www.winamp.com/
Winamp is developed by Nullsoft, the same people who develop SHOUTcast itself. VosCast recommends Winamp if you are new to internet net radio streaming.
StationPlaylist Suite
StationPlaylist Studio
- Runs on Windows: Yes
- Runs on Mac OS X: No
- Runs on Linux: No
- Price: Standard $109/ €84 - Pro $239/ €185
- Demo: Yes, lasts for 6 hours, terminates then allows for a further 6 hours.
- Developer: StationPlaylist
- Website: http://www.stationplaylist.com/studio.html
StationPlaylist Creator
- Runs on Windows: Yes
- Runs on Mac OS X: No
- Runs on Linux: No
- Price: Lite $49/ €38 - Standard $109/ €84 - Pro $239/ €185
- Demo: Yes, lasts for 6 hours, terminates then allows for a further 6 hours.
- Developer: StationPlaylist
- Website: http://www.stationplaylist.com/creator.html
StationPlaylist Studio features general automation playback and live assistance tools for DJs.
StationPlaylist Creator is music and spot scheduling software. It is used to design your station format using rotations of music categories and spot groups (jingles, ads, etc).
The two are generally used in tandem, and StationPlaylist offers bundles that contain both Sudio and Creator offered at a discounted price.
For detailed information on how to use StationPlaylist, please consult with their detailed FAQ.
Nicecast
- Runs on Windows: No
- Runs on Mac OS X: Yes
- Runs on Linux: No
- Price: Single user $40 - 5 users $69
- Demo: Yes, noise is overlaid on all broadcasts longer than 60 minutes.
- Developer: Rogue Amoeba
- Website: http://www.rogueamoeba.com/nicecast/
Nicecast lets you stream audio from your microphone and optionally another media player like iTunes.
Butt - broadcast using this tool
- Runs on Windows: Yes
- Runs on Mac OS X: Yes
- Runs on Linux: Yes
- Price: Free
- Developer:
- Website: https://sourceforge.net/projects/butt/
Butt is open source and cross platform software to connect to your SHOUTcast server and will encode and stream audio from your microphone or line-in.
AltaCast
- Runs on Windows: Yes
- Runs on Mac OS X: No
- Runs on Linux: No
- Price: Free
- Website: http://www.altacast.com
AltaCast is a continuation of the abandoned Oddcast/Edcast streaming software. It's currently not compatible with SHOUTcast 2.0 servers.
AltaCast offers various plugins for different media players, as well as a standalone application for streaming from your computer's line-in or microphone.
Virtual DJ Pro
- Runs on Windows: Yes
- Runs on Mac OS X: Yes
- Runs on Linux: No
- Price: $299 - Free version available, but can't stream for more than 10 minutes.
- Website: http://www.virtualdj.com/
Author: Bryan
Last update: 2020-03-02 23:50
Getting Started with SAM Broadcaster
Author: Bryan
Last update: 2020-03-02 23:46
Getting Started with Nicecast
1. Register on VosCast.com
The first step to starting your own online radio station is purchasing radio hosting!
You can do this right here on VosCast.com. Head over to the plans page to get started.
Now, you may be wondering which plan to choose. This depends mostly on your budget.
128Kb/s will sound the best, and 24Kb/s will sound the worst.
If you have a low budget, we recommend 48Kb/s. However, for the best quality, go with 128Kb/s.
Go to the Plans Page (New window)
2. Set up Your Computer for Broadcasting
Now that you have a SHOUTcast server, you're ready to start streaming. The following steps will outline what you need to do to start streaming live. This tutorial is for Mac OS X.
a. Install Nicecast
You can download and purchase Nicecast from Rogue Amoeba’s website.
b. Configure Nicecast for streaming
1. Launch Nicecast
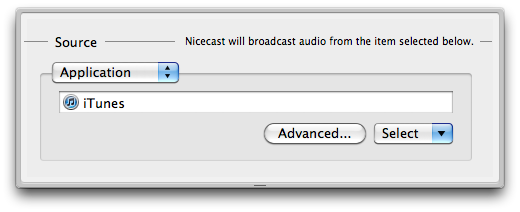
2. By default, Nicecast will select iTunes as the audio source. In most cases this will be the correct source for you, however you can change it by going clicking the “Source” button.
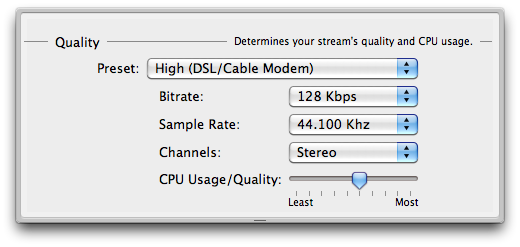
3. Click the “Quality” button. Select the bitrate of your plan and the channel (Stereo or Mono audio) you wish to stream in.
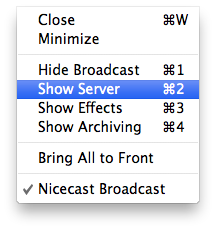
4. Click “Window” in the menu bar and select “Show Server”.
5. In the sidebar, click the “+” button to add a new server.
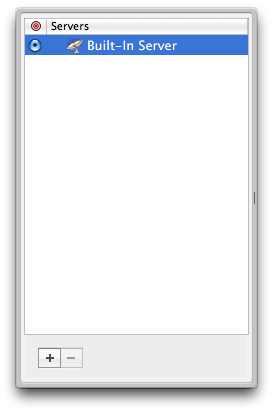
6. Type in your VosCast account information and make sure your new server is selected in the sidebar.

7. Close the server window and go back to the main Nicecast window. Now you can start broadcasting!
Author: Joseph D
Last update: 2011-07-02 17:33
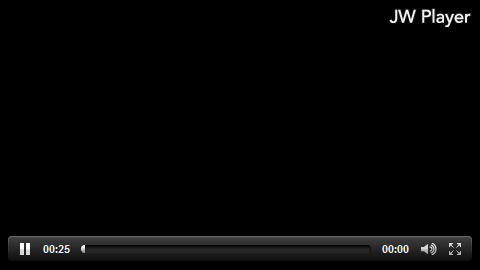
Creating a radio player with JW Player
JW Player is a highly customisable video and audio player for the web. While not specifically designed for streaming audio, it makes an excellent replacement for the flash player that we provide.
JW Player is available as a stand alone player, which we are using here. Some CMSs have JW Player available as a plugin/ addon for easy integration such as JW Player for Wordpress.
For licensing reasons, we've placed images on this page instead of the actual player.
Default settings
jwplayer("myElement").setup({
    flashplayer: "jwplayer.flash.swf",
    file: "http://s1.voscast.com:7000/;stream.mp3",
    type: 'mp3',
    flashvars: 'ignoremeta=true',
    provider: 'sound',
    primary: 'flash'
});
Audio only mode
![]()
jwplayer("myElement").setup({
    height: 30,
    flashplayer: "jwplayer.flash.swf",
    file: "http://s1.voscast.com:7000/;stream.mp3",
    type: 'mp3',
    flashvars: 'ignoremeta=true',
    provider: 'sound',
    primary: 'flash'
});
A complete list of configutation options for JW Player can be found here. You can also completely reskin JW Player with various skins found on their site.
Author: Bryan
Last update: 2013-08-14 16:13
Getting Started with Altacast
1. Install AltaCast
For this guide we'll be using the stand alone version of AltaCast, available from the AltaCast website.
You may need to also download and install MP3 and AAC encoders. Links to the encoders can be found on AltaCast's website in the downloads section.
2. Configure AltaCast for streaming.
a. Launch AltaCast
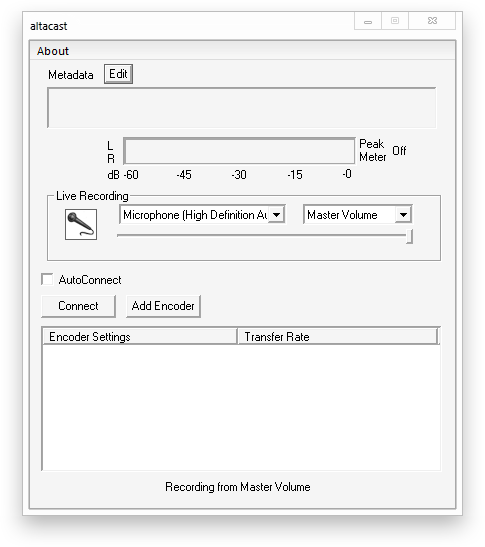
b. Click "Add Encoder", then double click the row that is added to the bottom table to open the configuration window.
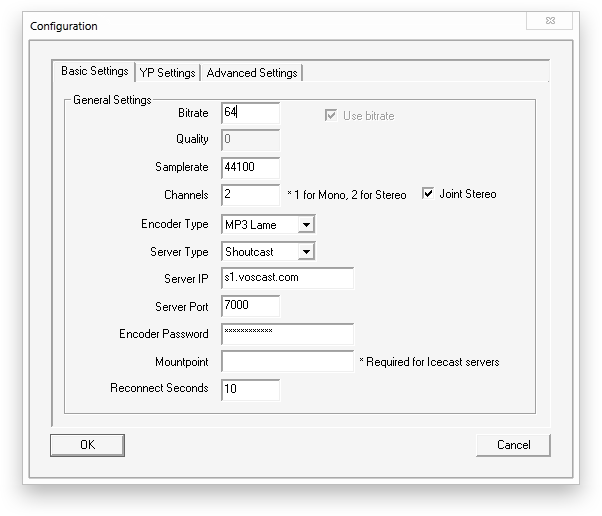
On the Configuration window, in the Basic Settings tab:
Tick "Use Bitrate", then enter your server's maximum bitrate in the bitrate field.
Change "Encoder Type" to either MP3 Lame or AAC.
Change "Server Type" to Shoutcast.
Enter your server's address, port, and password into "Server IP", "Server Port" and "Encoder Password".
Erase all the text in "Mountpoint" leaving the field blank.
d. On the Configuration window, in the YP tab customise "Stream Name" and the other fields to fit your server.
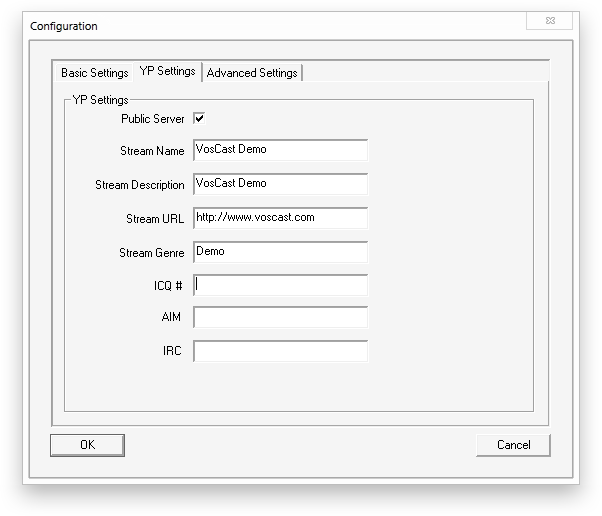
Click OK to save your configuration settings and close the Configuration window.
e. Click Connect to start streaming to the server.
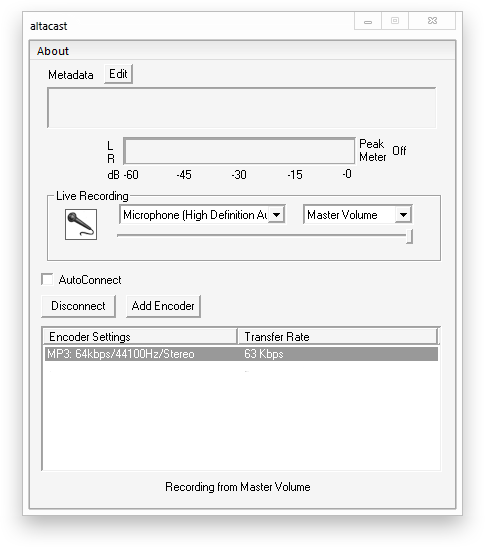
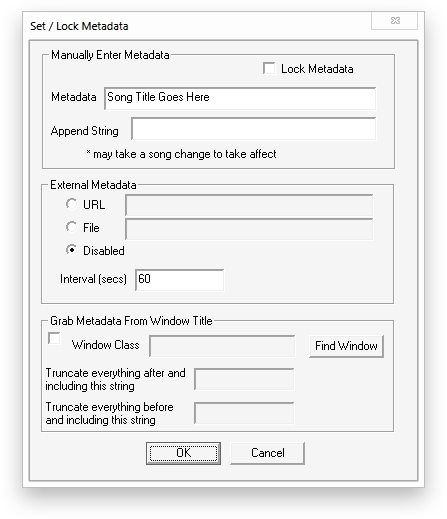
f. To set your song metadata, click the "Edit" button next to "Metadata". You can then update your server's Metadata either manually, or by updating from a URL/ file, or from the title of another window.
Author: Bryan
Last update: 2013-07-17 19:29
Getting Started with Virtual DJ Pro
1. Install Virtual DJ.
For this tutorial, we are going to use the free edition of Virtual DJ. However, to stream for longer than 10 minutes, you require a paid version of Virtual DJ.
You can download Virtual DJ from the Virtual DJ website.
2. Configure Virtual DJ for streaming
a. Under Virtual DJ's decks, click "RECORD", then click "BROADCAST".
b. Click the "CONFIG" button to bring up the broadcast config window
c. Under "Format", tick "MPEG (Shoutcast/Icecast2)". Change "Bitrate" to match your server's maximum bitrate.
Under "Server", tick "Broadcast to a radio server", then fill in your server details into the fields below.
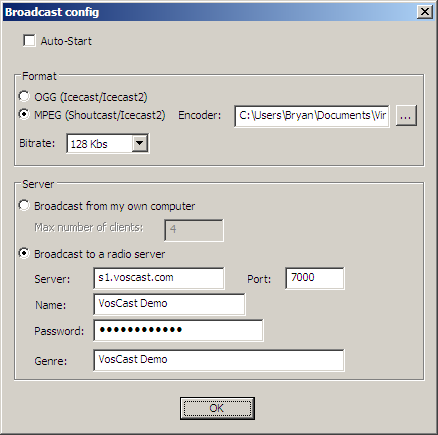
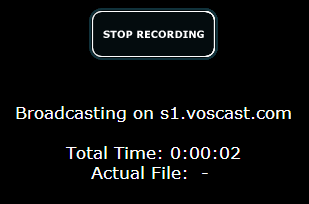
d. Click "OK", then click "START RECORDING". You should now be connected and streaming to your server.
Author: Bryan
Last update: 2013-07-22 18:15
Getting Started with Audio Hijack
Audio Hijack is advanced software used for broadcasting and recording audio. It has many features that are covered in detail in their own guide. Our guide will focus on connecting Audio Hijack to your VosCast server. For more detailed information on all of the features of Audio Hijack, I recommend reading their manual inside of Audio Hijack, which is accessible through the menu bar by going to Help > Audio Hijack Manual.
1. Download and Install Audio Hijack.
Audio Hijack is available on the Rogue Amoeba website: https://rogueamoeba.com/audiohijack/
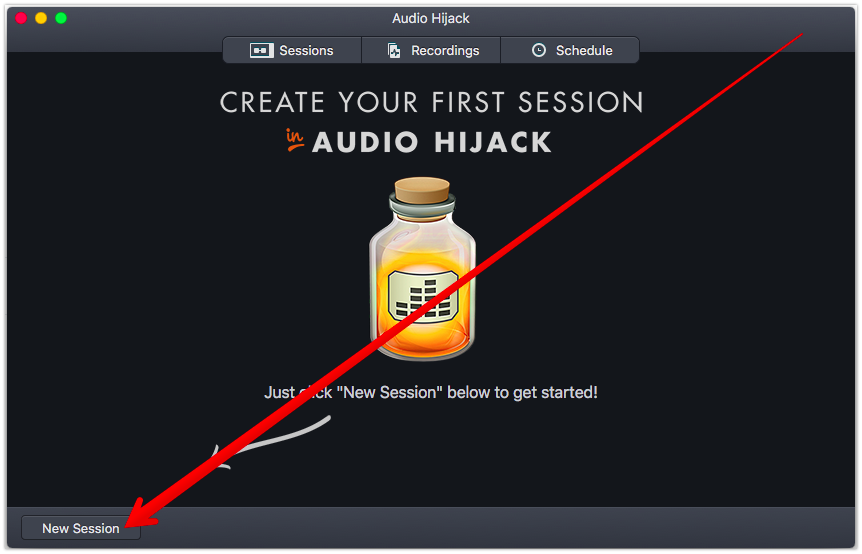
2. Create a new session
You can do this by clicking the “New Session” button in the bottom-left corner of the Audio Hijack window.
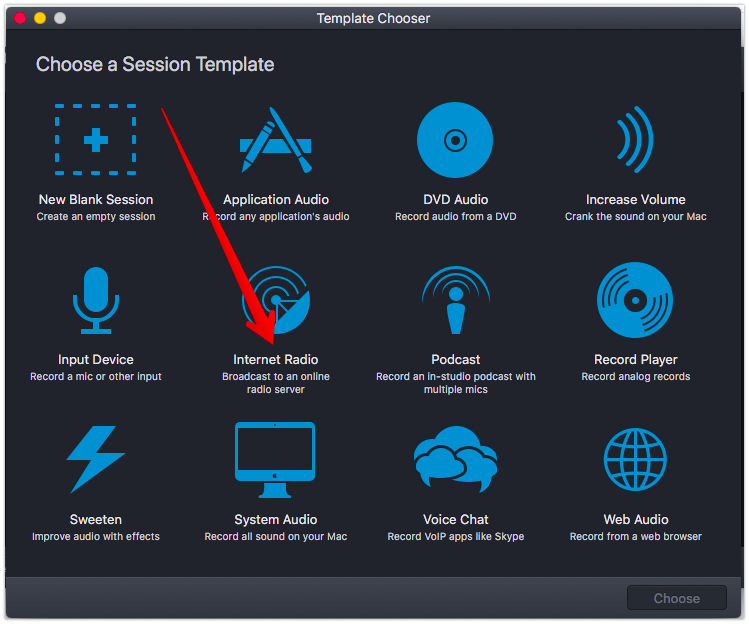
3. Choose the “Internet Radio” session template.
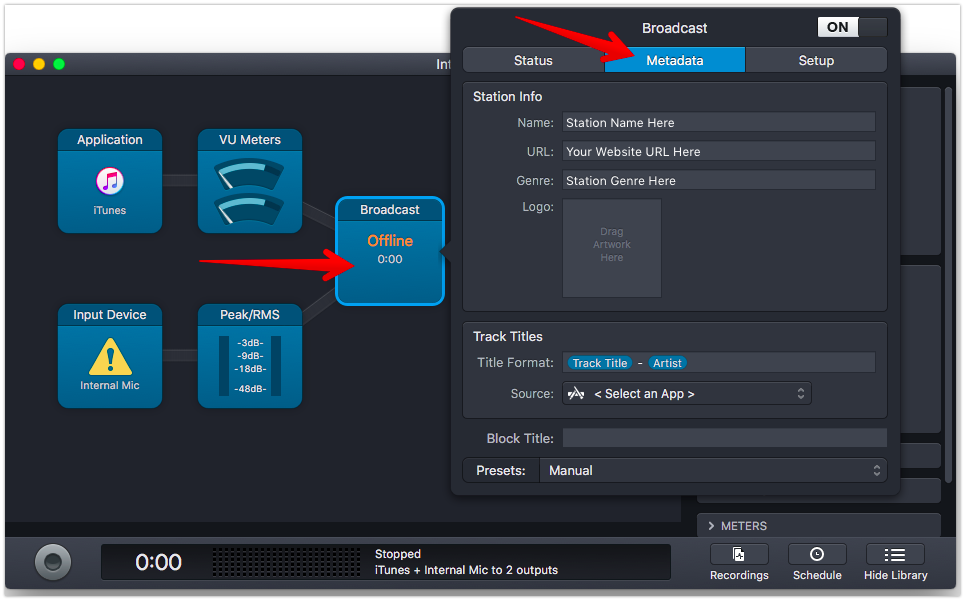
a. Click “Broadcast”, then go to “Metadata” and input your station details.
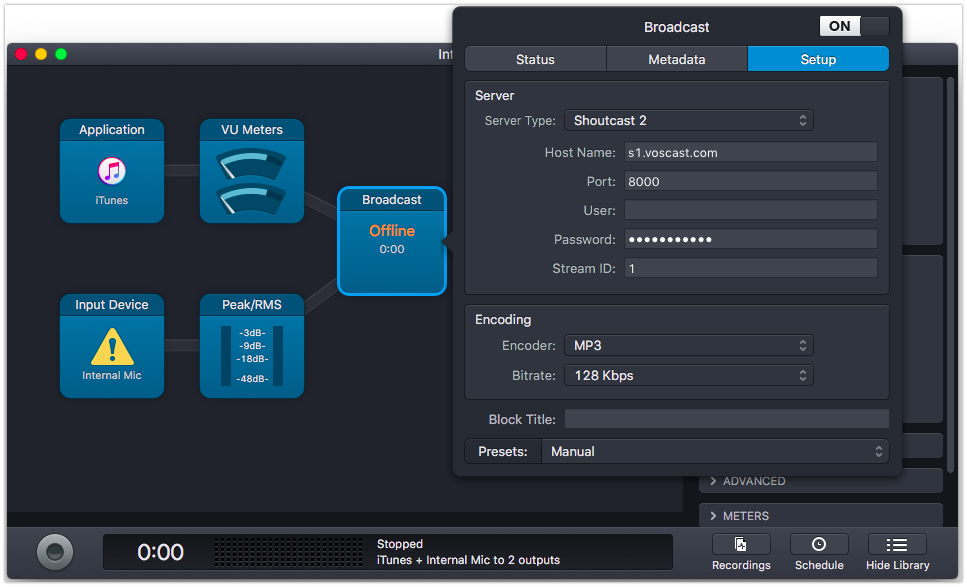
4. Enter your server details
a. Go to the “Setup” tab and set the server type as “Shoutcast 2”
b. Leave the “User” field empty.
c. Enter the server details found in the VosCast client area, on the “Account Overview” page.
d. Set the “Station ID” as “1”.
e. Change the bitrate to the maximum bitrate of the VosCast plan you selected. You can find this in the client area as well, if you cannot remember the bitrate of your plan.
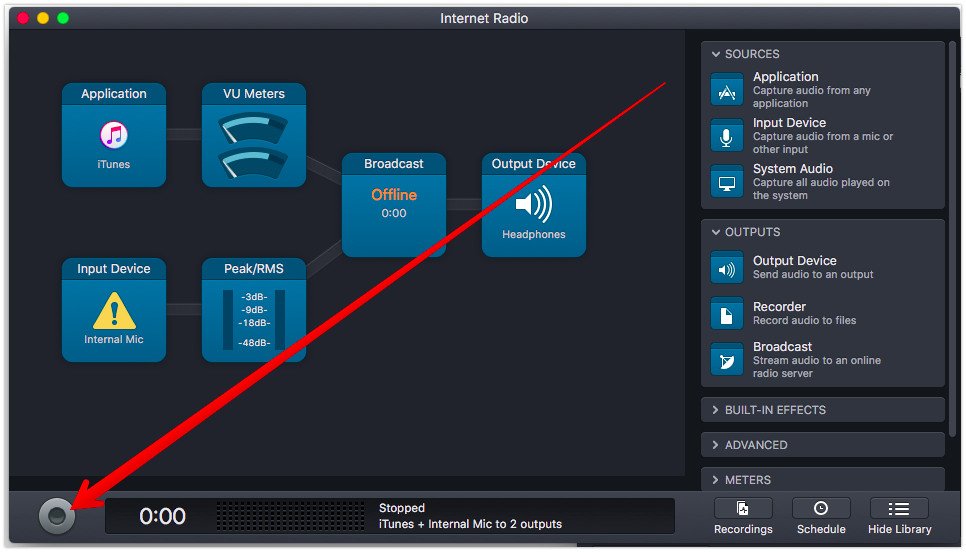
5. Begin Broadcasting
To begin broadcasting, simply click the "Record" button in the bottom-left corner of the Audio Hijack window.
Author: Joseph D.
Last update: 2018-07-19 02:23
Getting Started With Mixxx for SHOUTcast
Mixxx is advanced DJ software which can be used for broadcasting. It has many features, covered in the manual Mixxx provides. Our guide will focus on simplifying its interface for basic usage and using it for broadcasting.
- Download and Install Mixxx
You can download Mixxx from their website here: https://www.mixxx.org/download
It is available for Windows, macOS, and Linux. - Open Mixxx
A window may appear asking for you to select your audio files. You can choose your audio file location or simply close the window if you’d prefer to select them later.
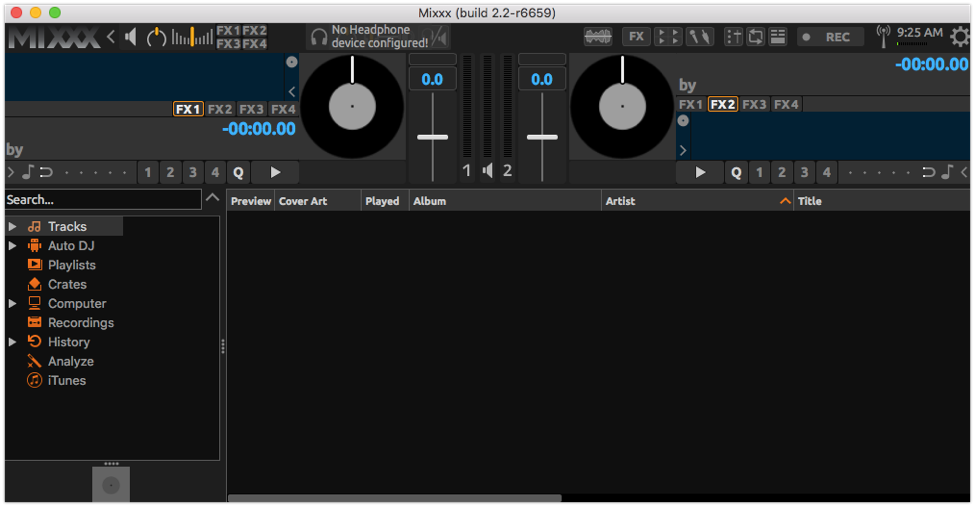
Simplifying the Interface
- Open the Mixxx settings
- Go to “Interface” in the sidebar and switch to the “Tango” skin.

- Close the settings window.
- Disable the interface items at the top of the Mixxx window:
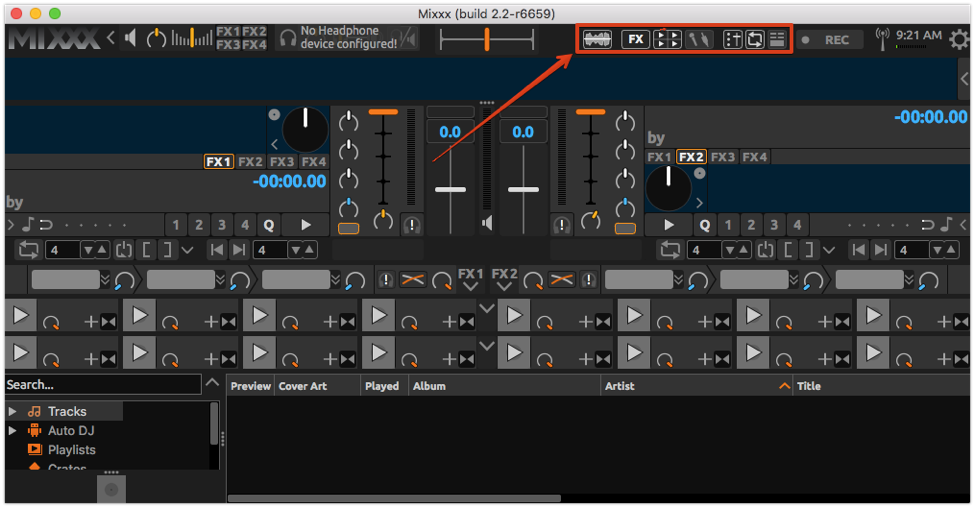
Broadcasting with Mixxx
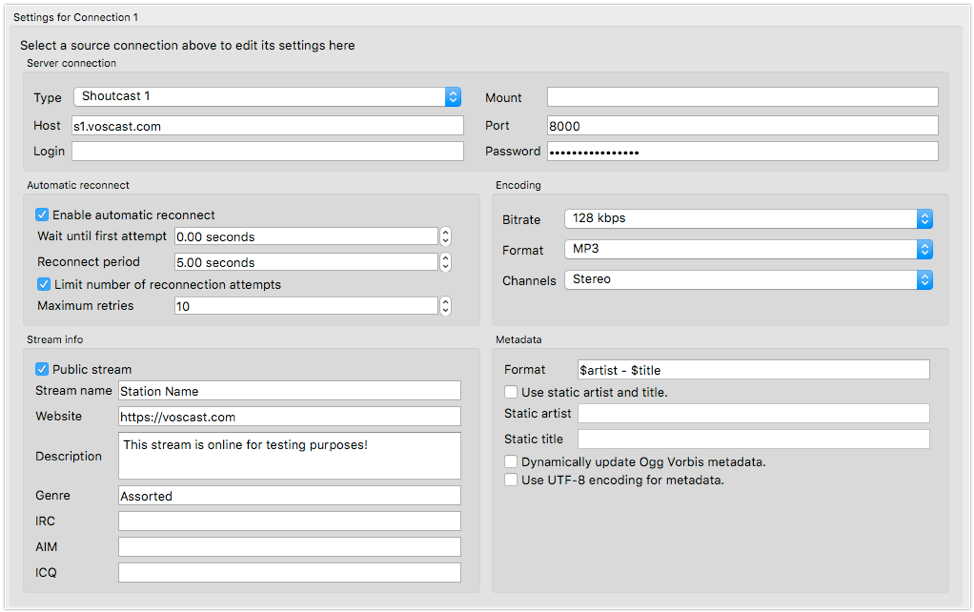
- In the settings of Mixxx, go to “Live Broadcasting” in the sidebar.
- Change the “Type” to “Shoutcast 1”.
- Enter your “Server IP”, found in your VosCast account, into the “Host” box.
- Enter your “Port” into the “Port” box.
- Change the “Bitrate” option to the maximum bitrate of your plan.
- Enter your station name and other details in the “Stream info” section.
- Close the settings window.
- If you will be broadcasting in MP3 format, complete the LAME MP3 codec installation guide here.
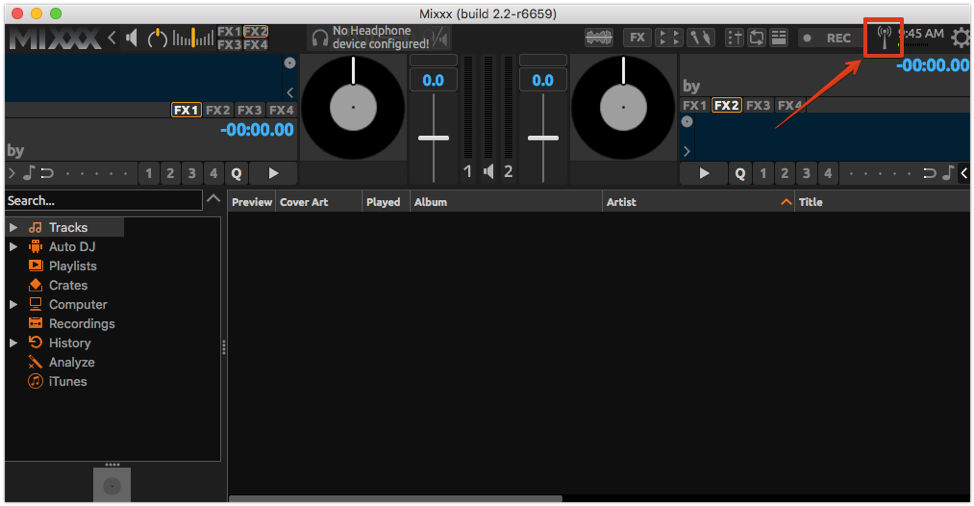
- Click the antenna icon at the top of Mixxx to begin broadcasting. After that, any audio you play inside of Mixxx will broadcast on your station.
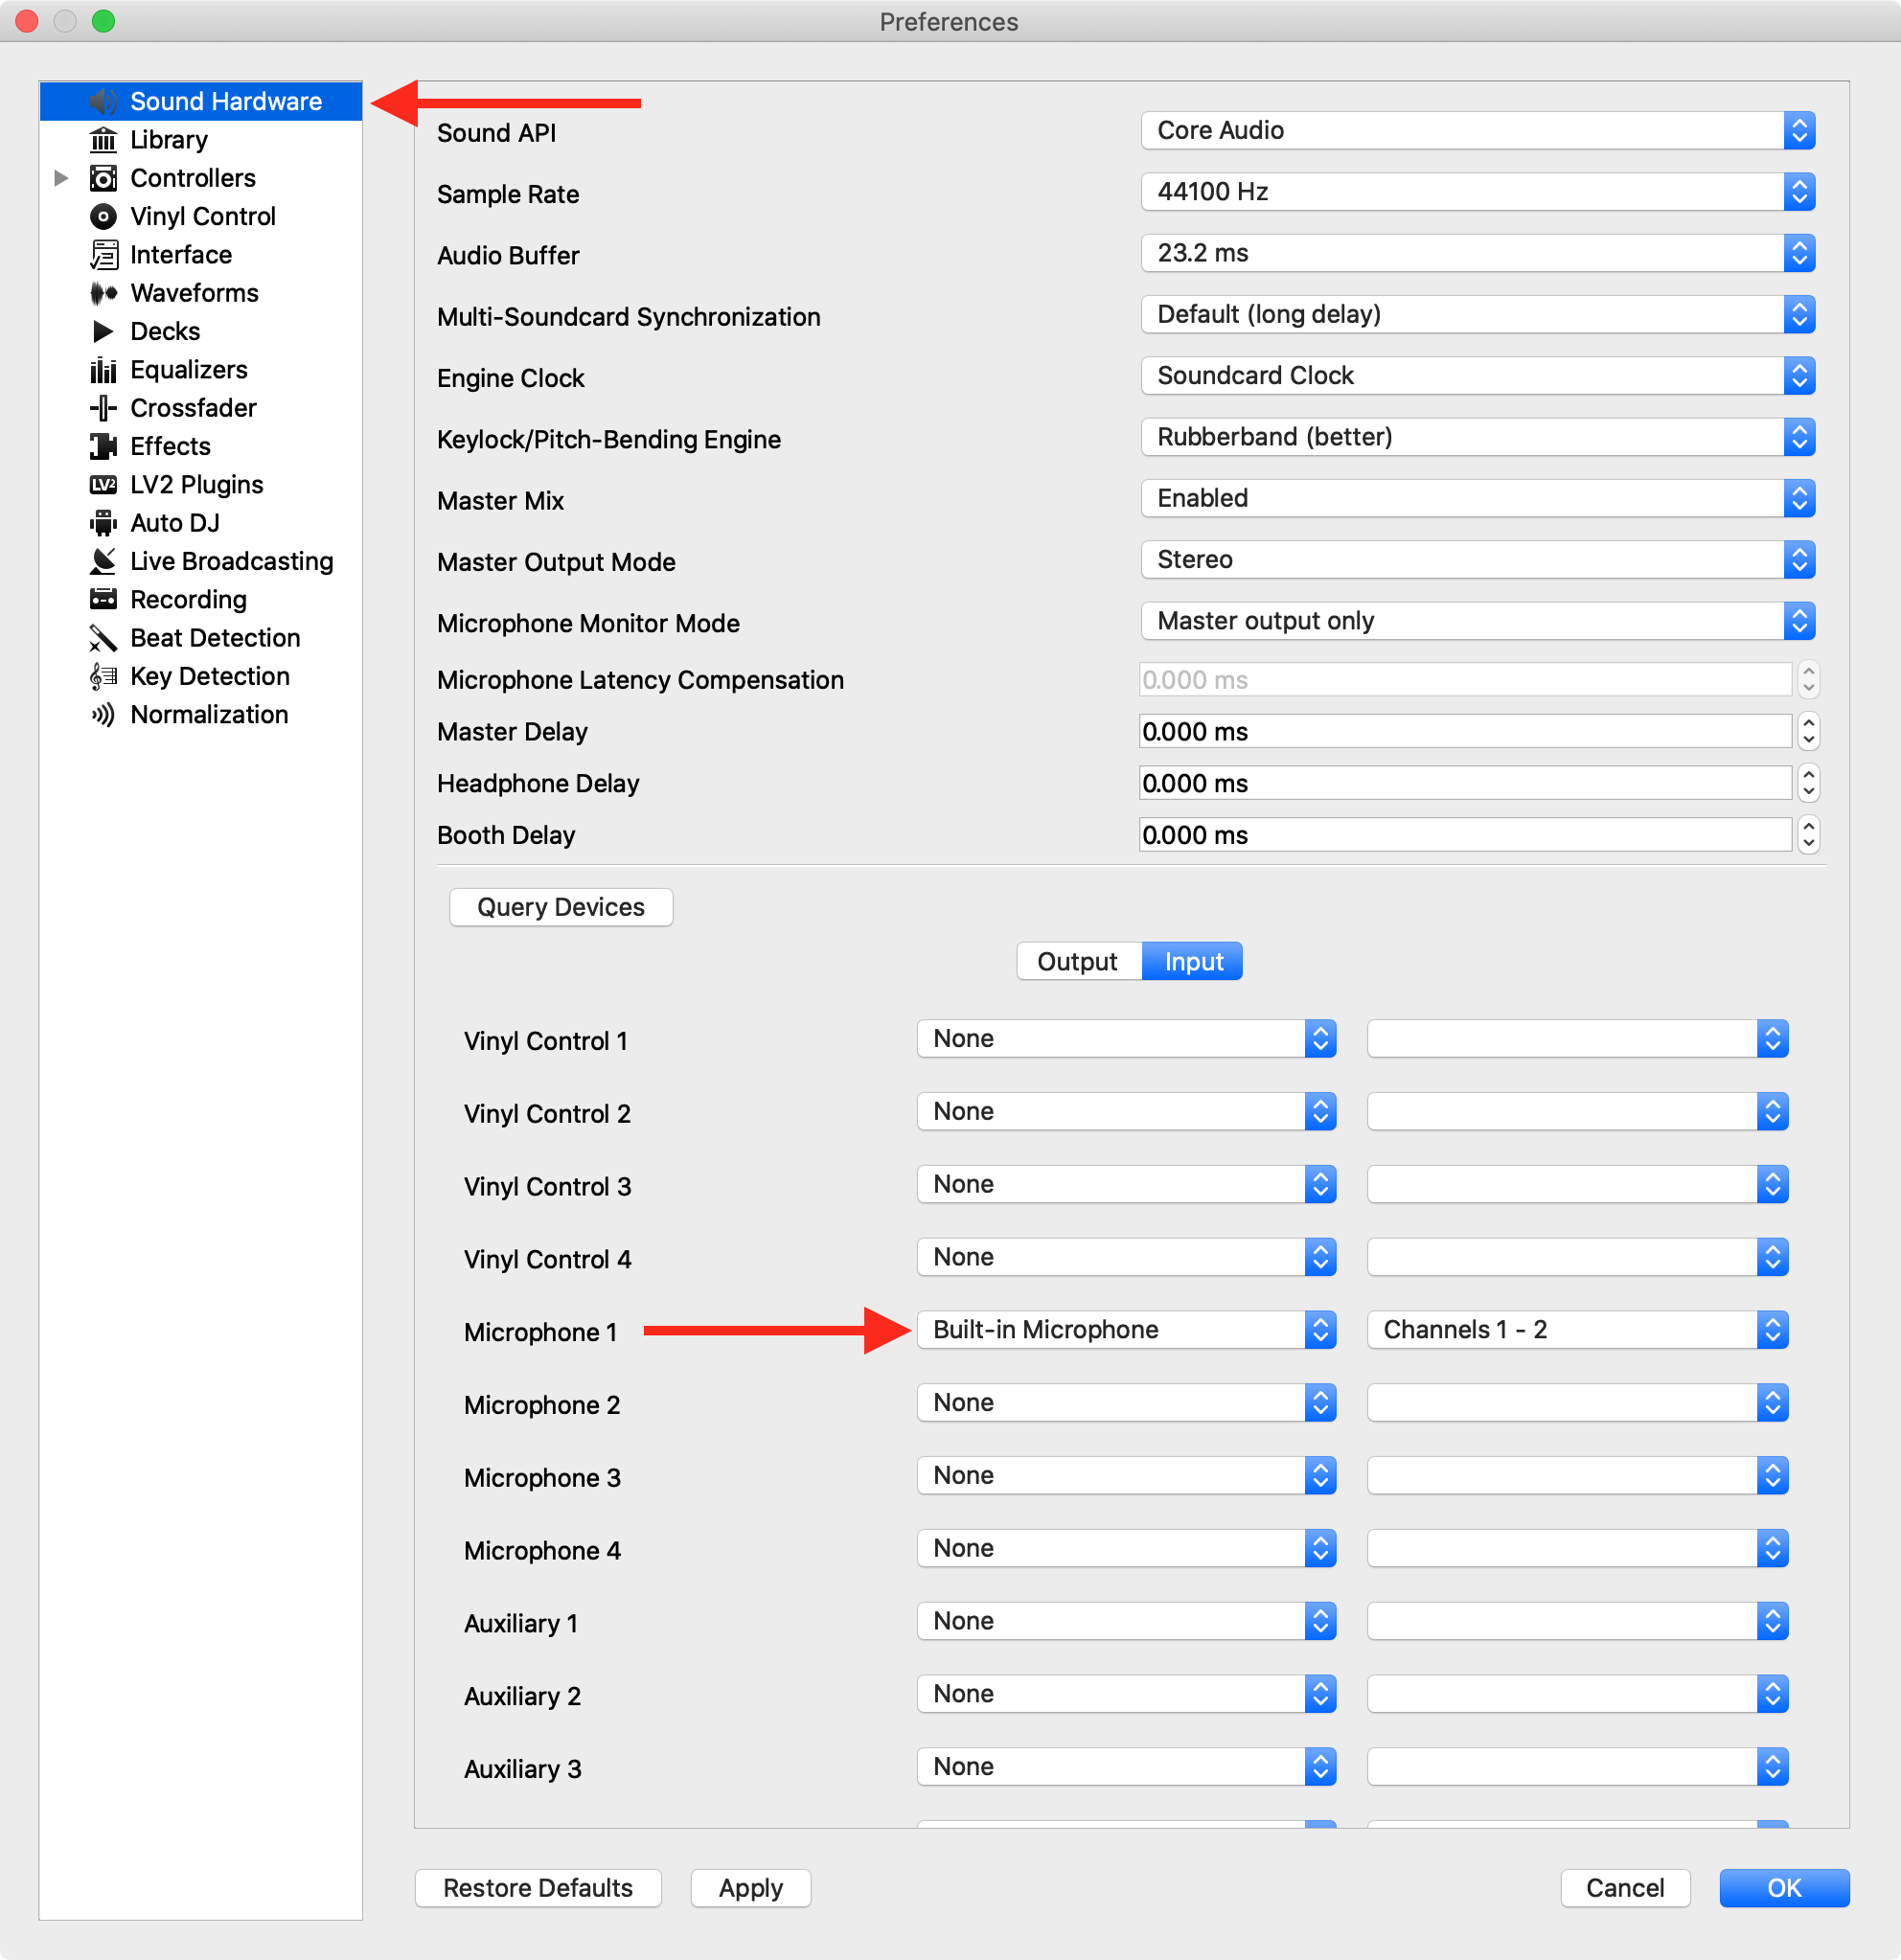
Using a Microphone
- Open the Mixxx settings
- Go to Sound Hardware > Input
- Select your microphone
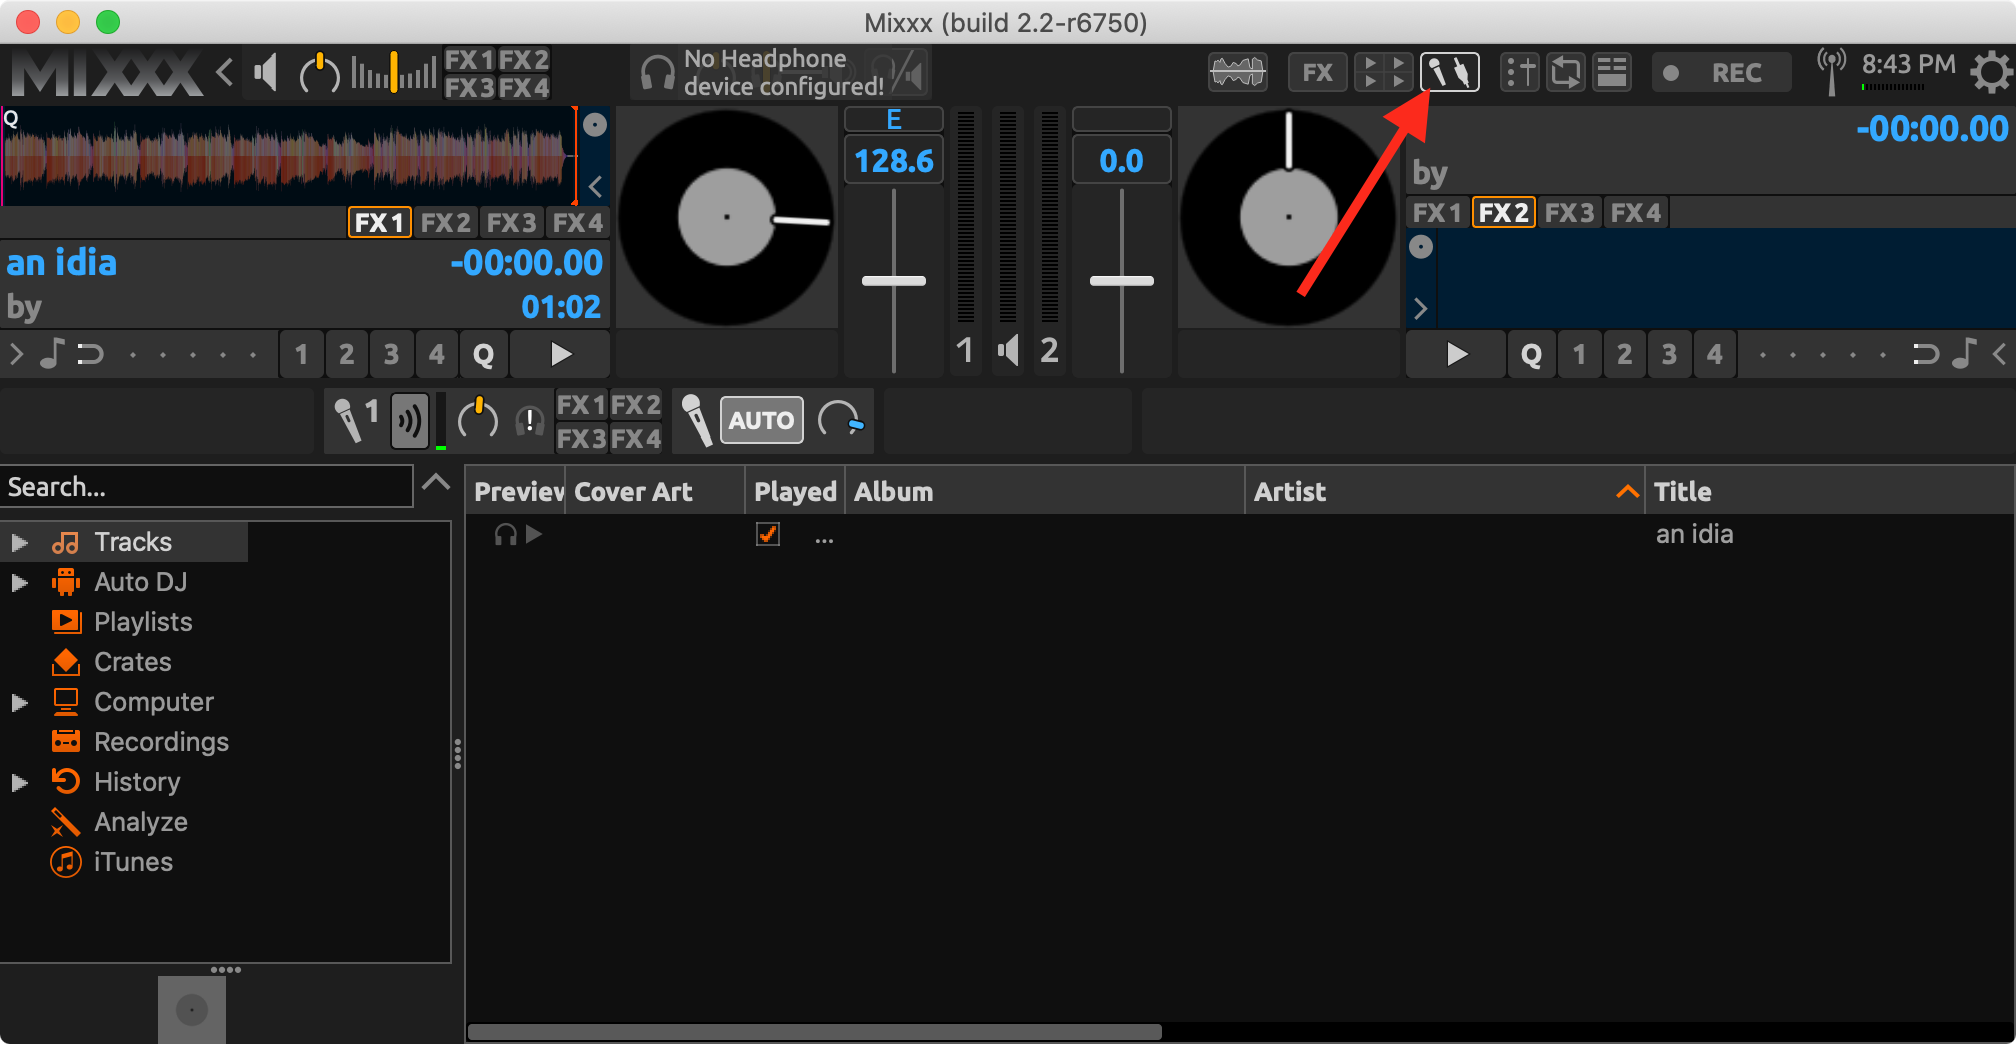
- Enable the mic interface item
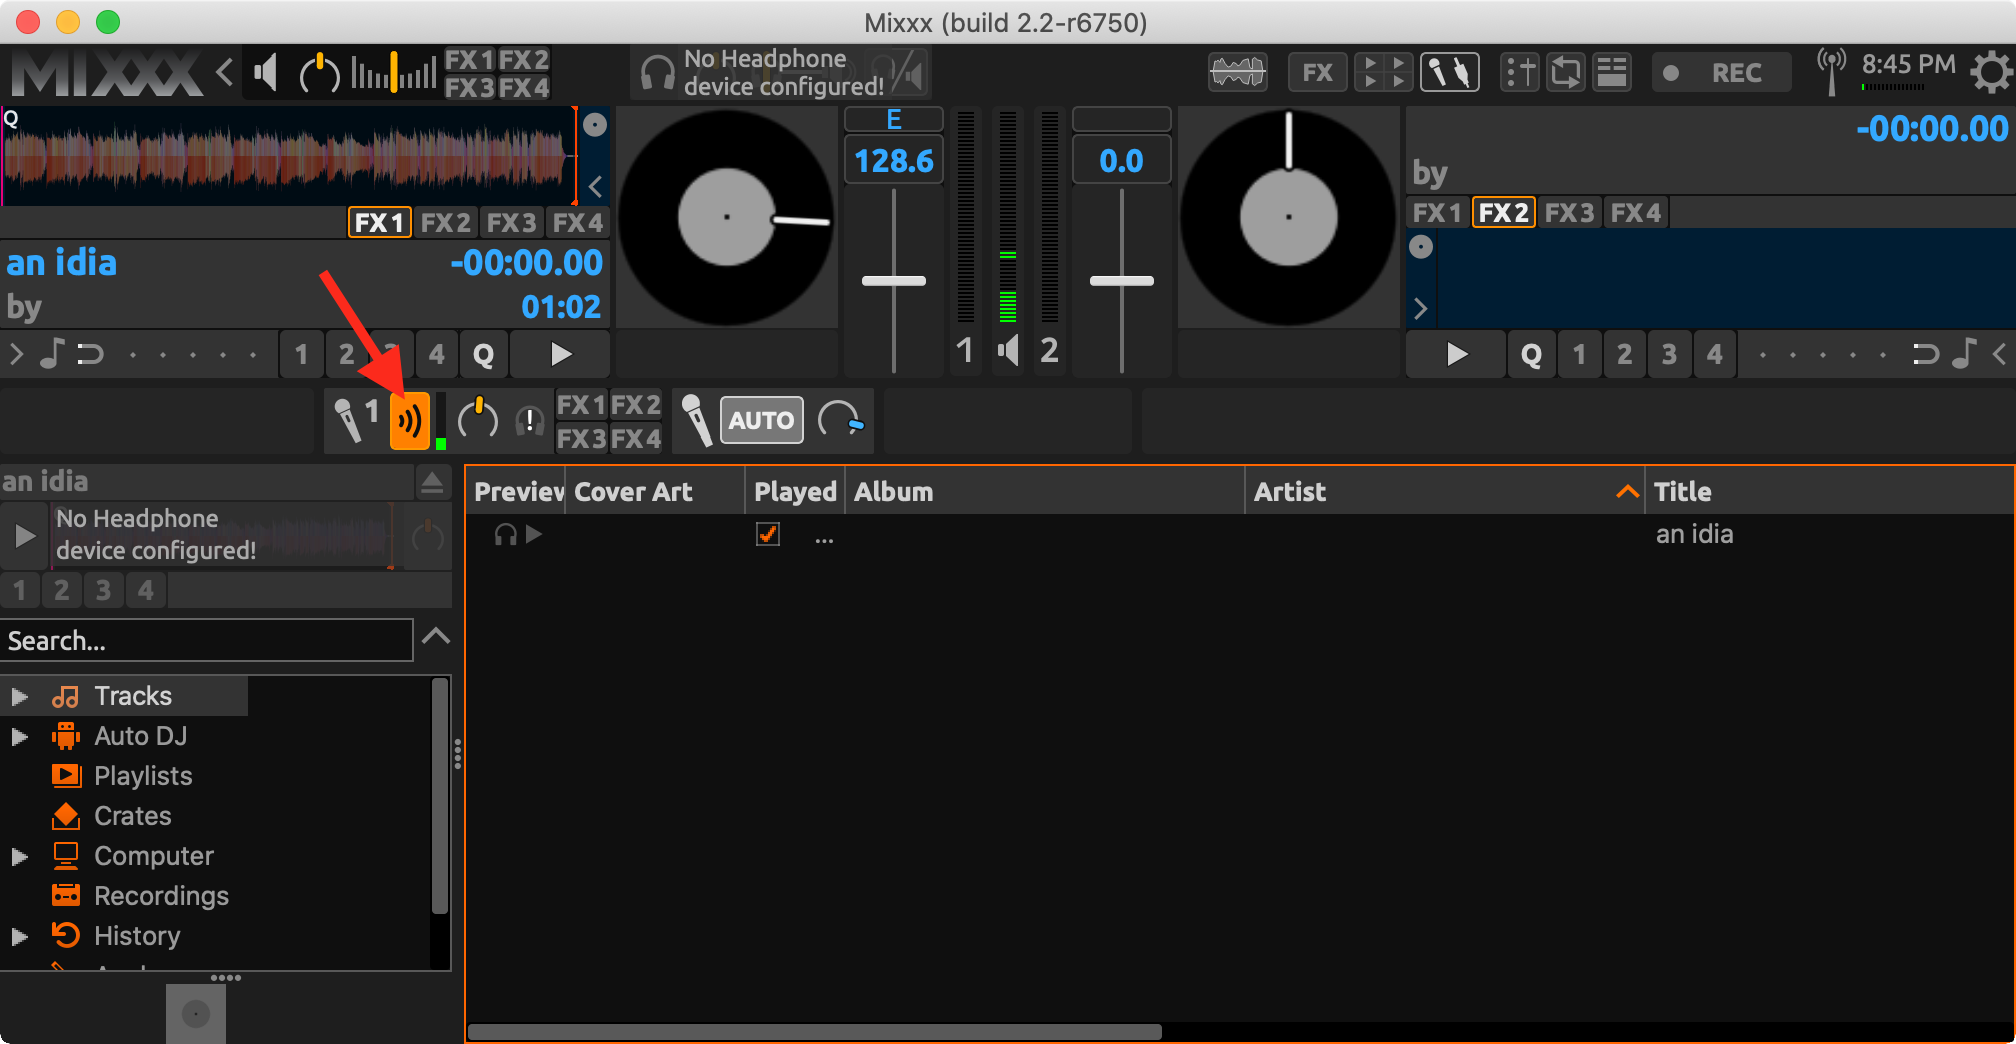
- When you're ready to mix your microphone audio into the output, click the "Microphone Talk-Over" button. Press it again to stop broadcasting your microphone.
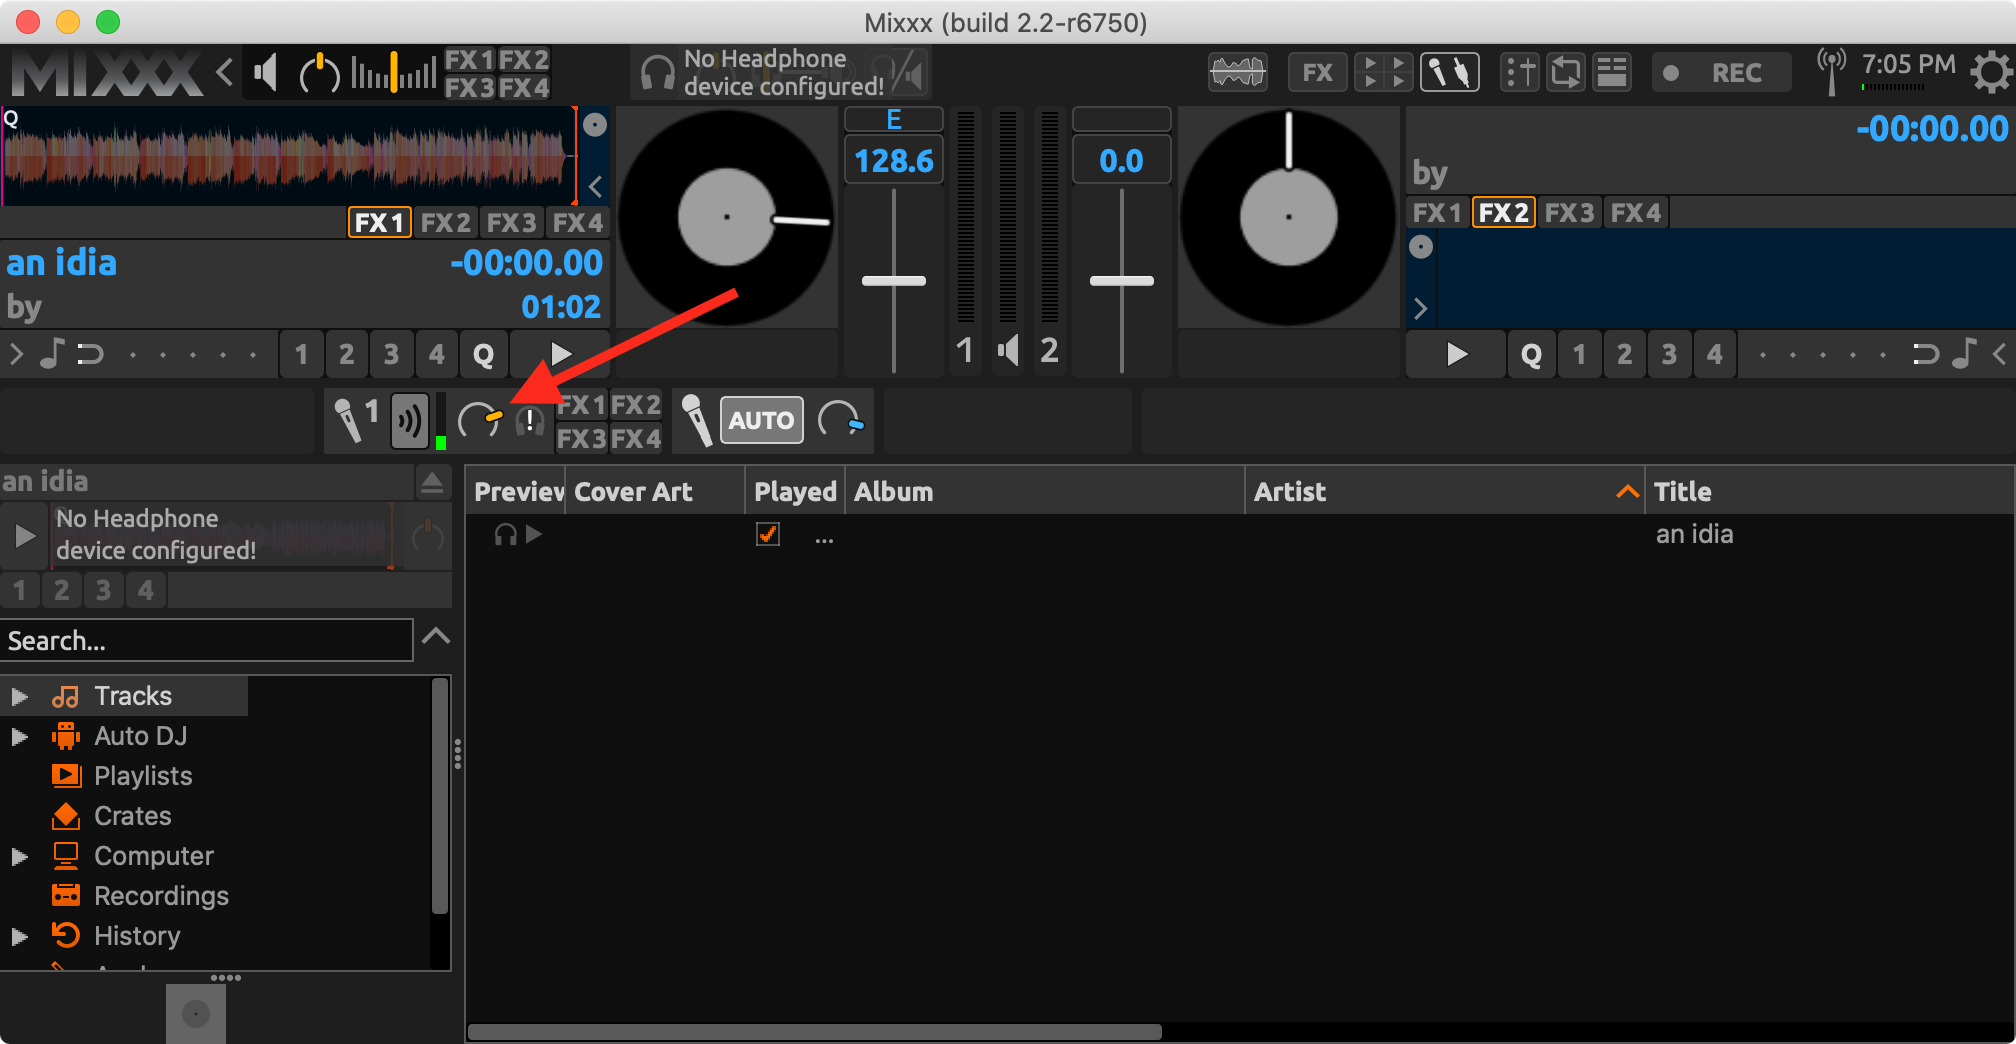
- Adjust the output level of the microphone by clicking and dragging the dial to where you want it.
Automatically Play Audio Files
In Mixxx, you normally have to manually queue-up audio files and play them when you're ready to. If you aren't interested in manually DJing this way, you can use Mixxx's Auto DJ feature.
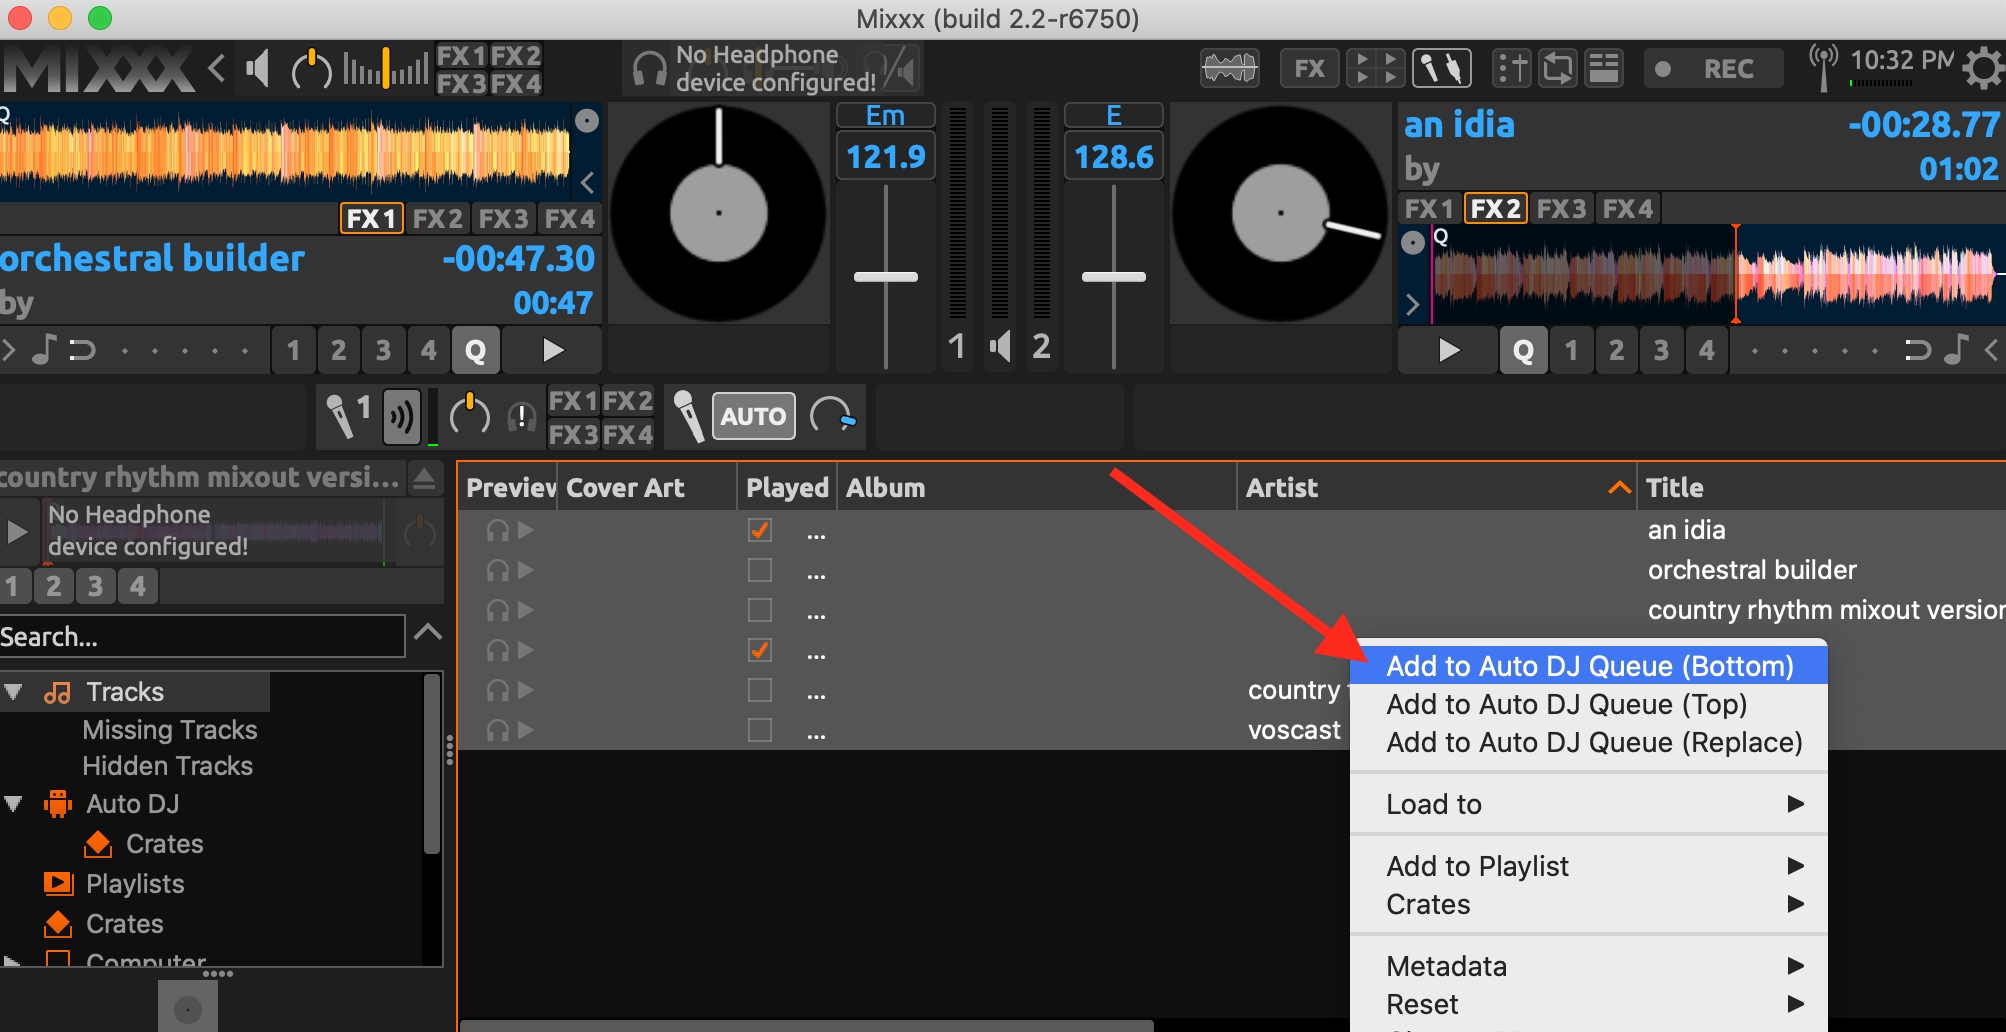
- Ctrl/cmd + click the tracks you want included. Alternatively, click the first track, hold shift, and then click the last track to select them all.
- Right-click the selected tracks and choose one of the "Add to Auto DJ Queue" options.
- Go to the Auto DJ section and click "Enable Auto DJ".
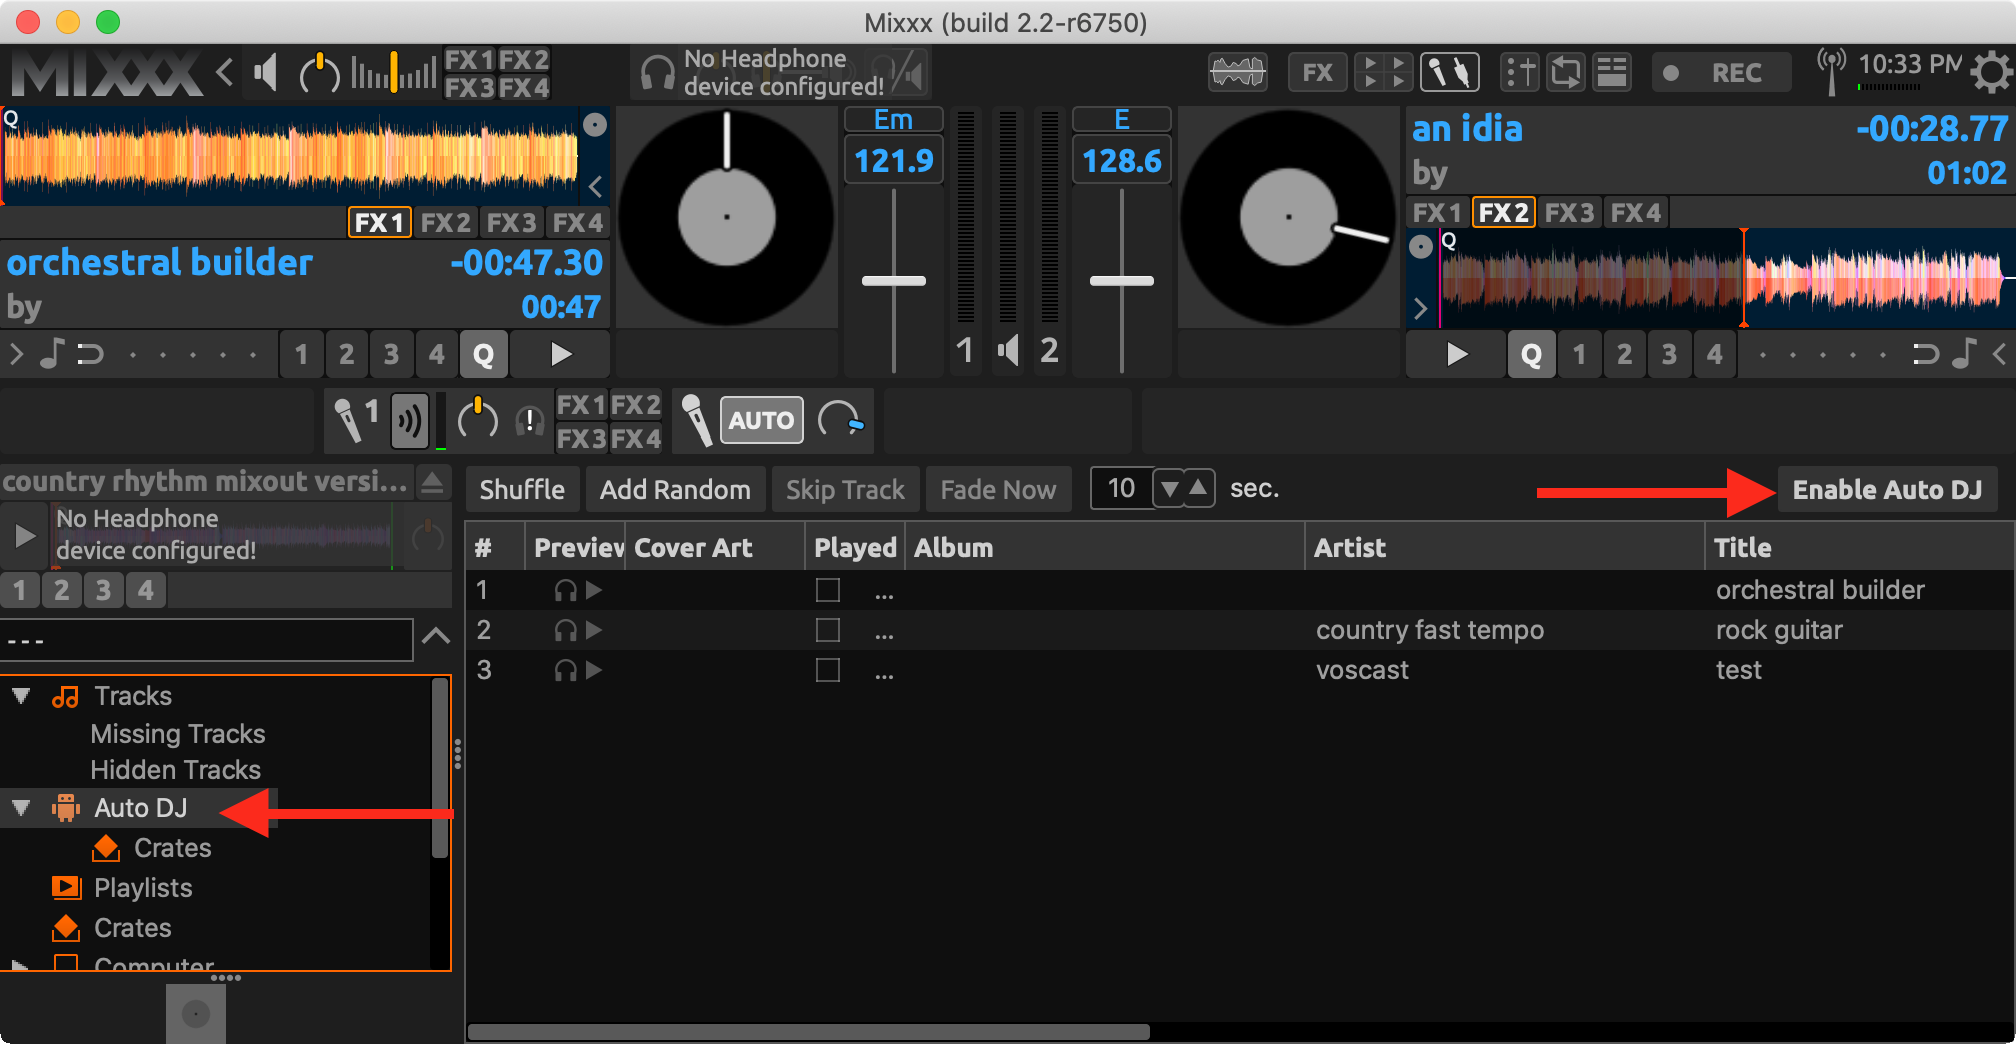
- Begin playing one of the tracks and the Auto DJ will automatically choose the next track(s) for you.
For more details on using all of the Mixxx features, check out their manual here: https://www.mixxx.org/manual/latest/en/
Author: Joseph
Last update: 2021-05-07 22:15
Getting Started - Basic Information
Thanks for signing up with VosCast!
To start streaming to your VosCast server with our Auto DJ system, check out our Auto DJ guide:
Getting Started with Auto DJ
Ready to start streaming from your computer? We have a number of tutorials available in our knowledgebase. Check them out here:
Recommended Software
The following software is currently recommended for broadcasting to Icecast servers:
Windows / macOS:
- Mixxx - Powerful DJing & broadcasting software [Free]
- butt - butt (broadcast using this tool) is an easy to use streaming tool [Free]
- Audio Hijack - Record and broadcast any audio [$59 USD]
- Virtual DJ Pro - Industry leading broadcasting software [$299 USD]
iOS:
- iziCast - Broadcasting client for iPhone and iPad [$4.99 USD]
- Backpack Studio - Record, mix, and master your radio show [$9.99 USD]
Android:
- BroadcastMySelf - Free Android client for Icecast/Shoutcast servers [Free]
- Cool Mic - Open source Icecast source client [Free]
Author: Daniel
Last update: 2020-03-02 23:38
Getting Started with Mixxx for Icecast
Mixxx is advanced DJ software which can be used for broadcasting. It has many features, covered in the manual Mixxx provides. Our guide will focus on simplifying its interface for basic usage and using it for broadcasting.
- Download and Install Mixxx
You can download Mixxx from their website here: https://www.mixxx.org/download
It is available for Windows, macOS, and Linux. - Open Mixxx
A window may appear asking for you to select your audio files. You can choose your audio file location or simply close the window if you’d prefer to select them later.
Simplifying the Interface
- Open the Mixxx settings
- Go to “Interface” in the sidebar and switch to the “Tango” skin.
- Close the settings window.
- Disable the interface items at the top of the Mixxx window:
Broadcasting with Mixxx
- In the settings of Mixxx, go to “Live Broadcasting” in the sidebar.
- Change the “Type” to “Icecast 2”.
- Set the "Mount" to "stream"
- Enter your “Server IP”, found in your VosCast account, into the “Host” box.
- Enter your first “Server Port” into the “Port” box. For example, if your "Server Ports" section says "7000, 7001 (SSL)", you would enter 7000 as your port.
- Enter "source" into the "Login" box.
- Enter your "Server Password" into the "Password" box. It can be found in your VosCast account, on the Account Overview page.
- Change the “Bitrate” option to the maximum bitrate of your plan.
- Enter your station name and other details in the “Stream info” section.
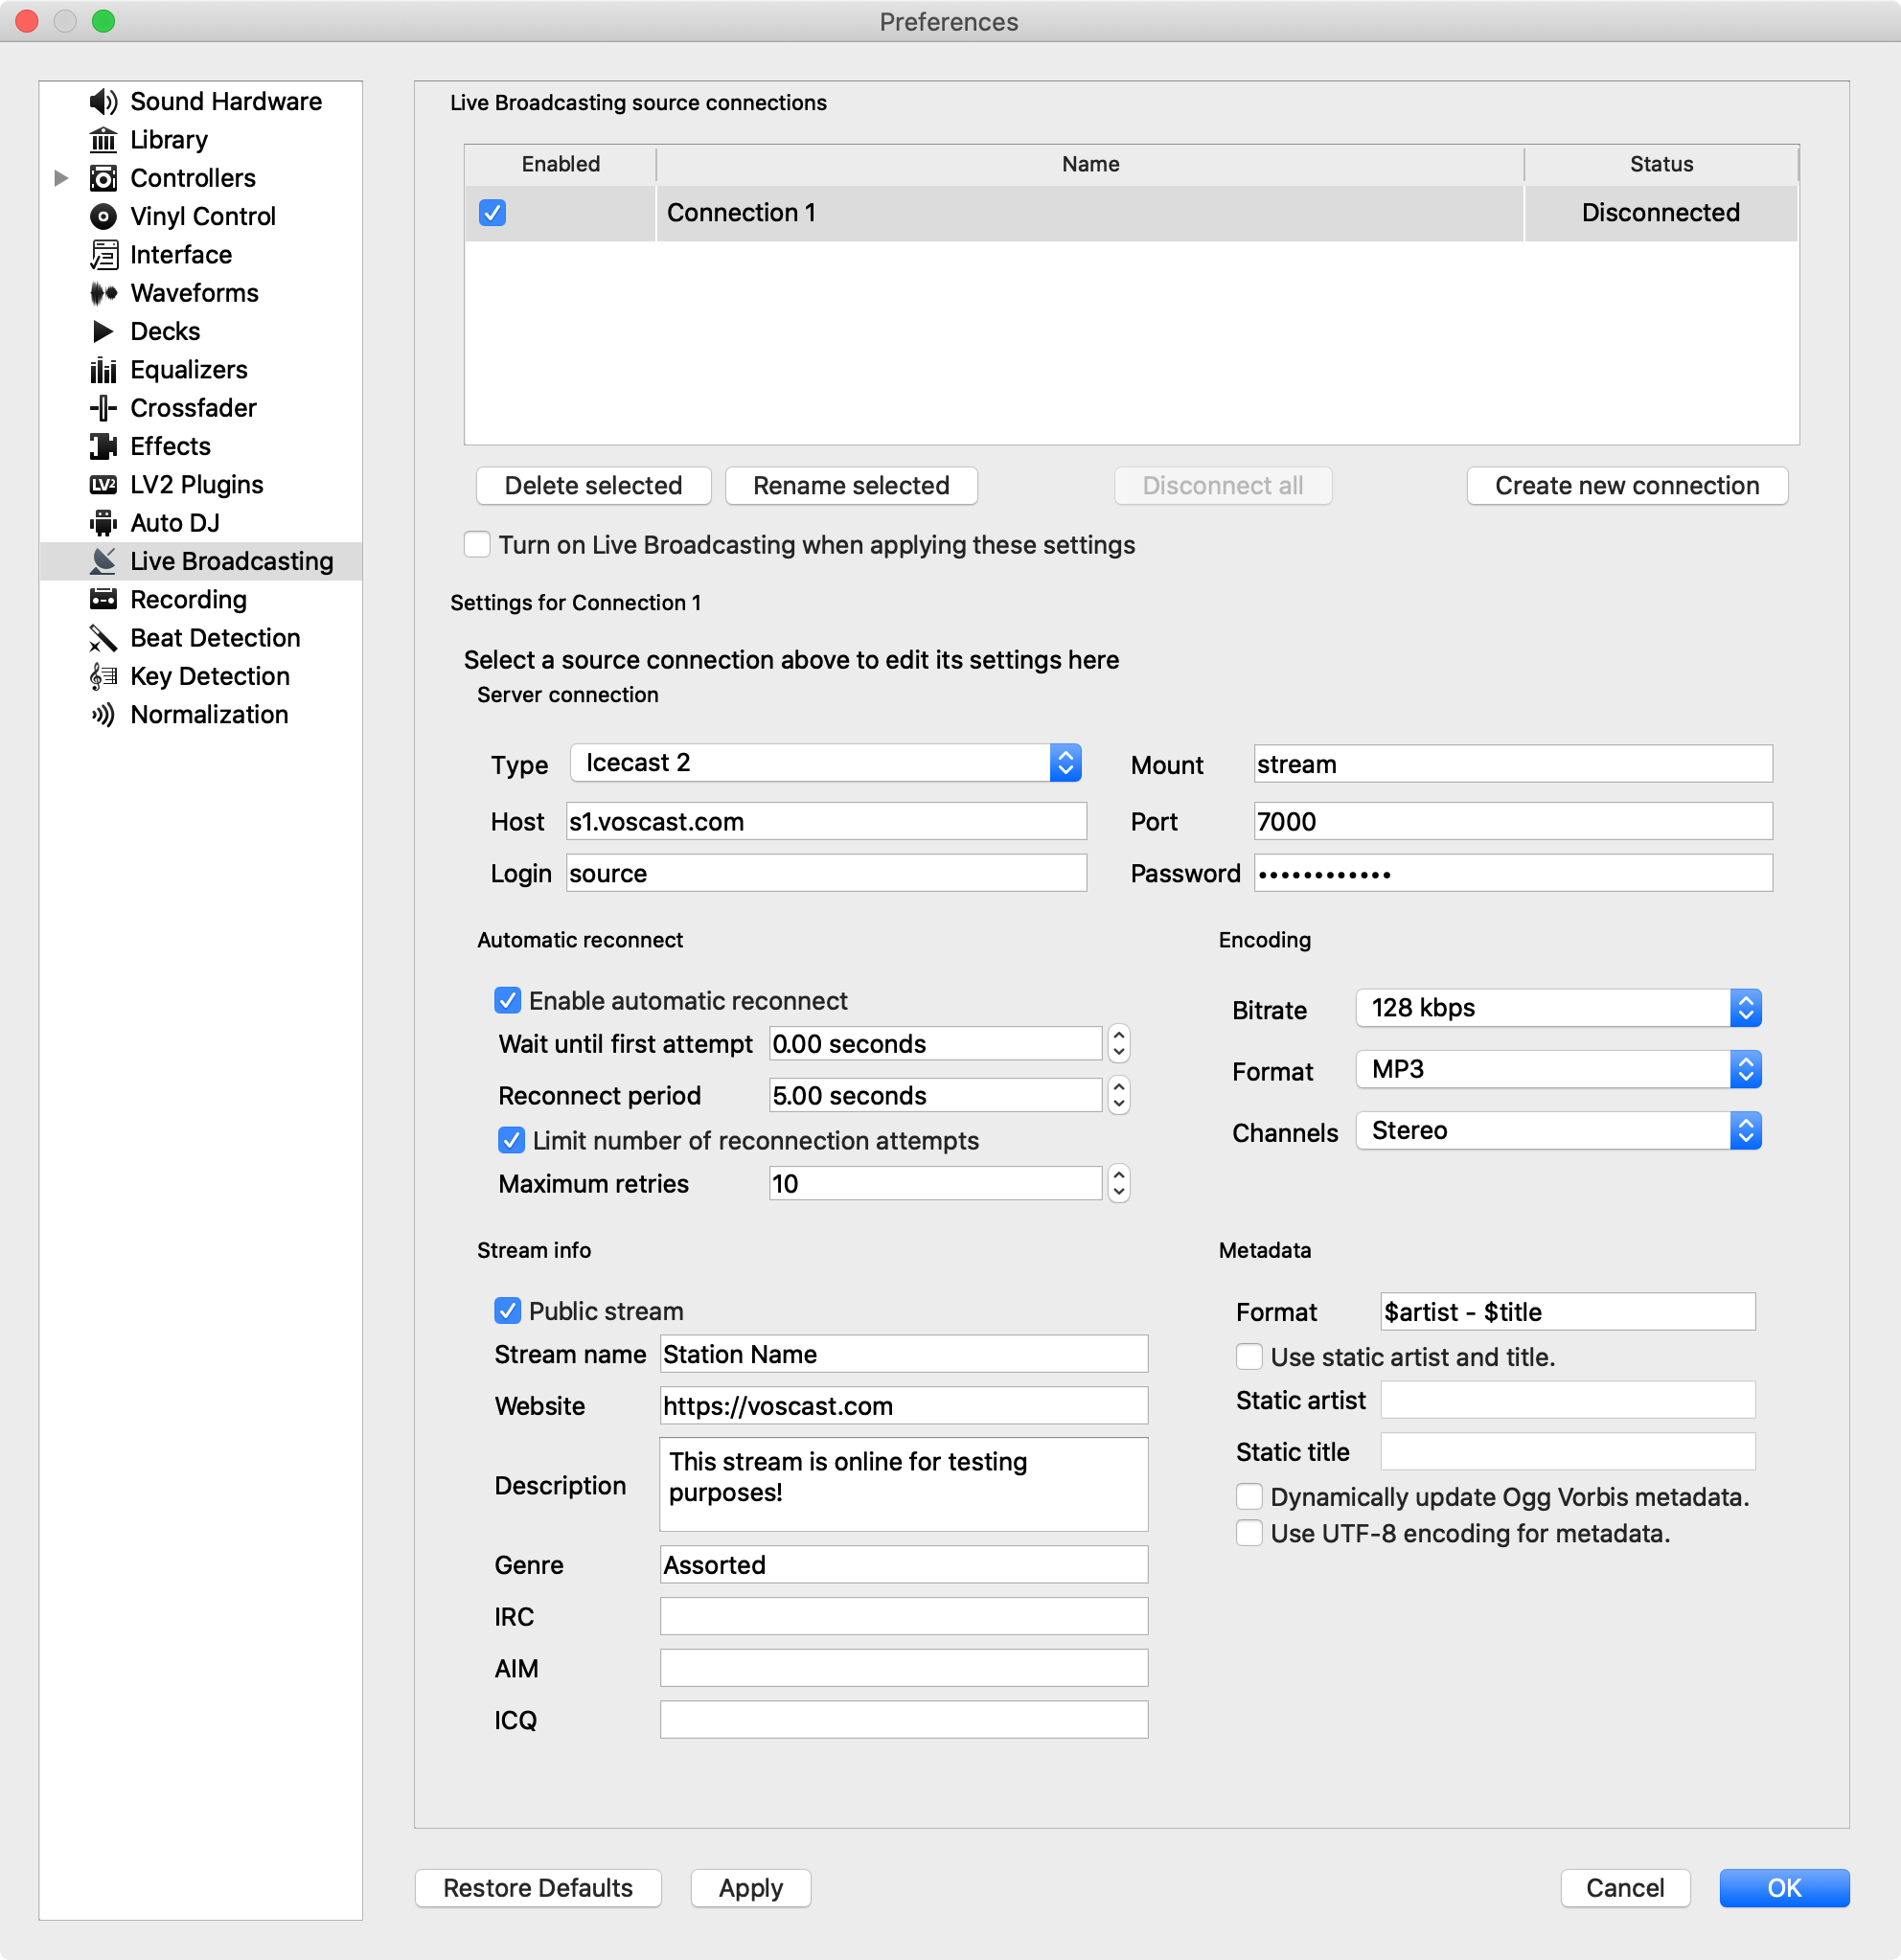
- Close the settings window.
- If you will be broadcasting in MP3 format, complete the LAME MP3 codec installation guide here.
- Click the antenna icon at the top of Mixxx to begin broadcasting. After that, any audio you play inside of Mixxx will broadcast on your station.
Automatically Play Audio Files
In Mixxx, you normally have to manually queue-up audio files and play them when you're ready to. If you aren't interested in manually DJing this way, you can use Mixxx's Auto DJ feature.
- Ctrl/cmd + click the tracks you want included. Alternatively, click the first track, hold shift, and then click the last track to select them all.
- Right-click the selected tracks and choose one of the "Add to Auto DJ Queue" options.
- Go to the Auto DJ section and click "Enable Auto DJ".
- Begin playing one of the tracks and the Auto DJ will automatically choose the next track(s) for you.
For more details on using all of the Mixxx features, check out their manual here: https://www.mixxx.org/manual/latest/en/
Author: Joseph
Last update: 2021-05-07 22:16
Getting Started with Winamp for Icecast
Author: Joseph
Last update: 2020-03-10 17:17
Billing
How can I cancel my VosCast account?
Method one
- Log into your account at VosCast.com
- Select Billing
- Select Manage Subscription
- Click Cancel Payment Subscription
- Your account will remain active until your remaining time expires
Method two
- Click this link
- Login to PayPal if prompted
- Click Cancel.
Author: Bryan
Last update: 2011-05-12 00:45
How do I upgrade my plan to a higher bitrate?
- Log into your account at VosCast.com
- Click Billing
- Click Upgrade Plan
- Cancel your current payment subscription
- Select the new bitrate and create a new payment subscription
Please note: When you update your subscription, your billing period will be reset. You will not be reimbursed or credited for any unused portion of the previous billing period, and for this reason, we recommend you only update your subscription near the end of your current billing period.
Author: Bryan
Last update: 2011-06-13 17:23
How do I downgrade my plan to a lower bitrate?
Author: Bryan
Last update: 2020-03-09 22:39
VosCast
Do I have to commit to a 12 month contract?
No, all accounts by default as on a 1 month rolling subscription. You are free to cancel at any time with no fee and will keep all remaining time on your account. You can change your subscription to annual billing after your first month.
Author: Bryan
Last update: 2011-05-12 00:46
Does VosCast offer a white label or reseller program?
No, we do not.
Author: Bryan
Last update: 2013-07-17 12:53
Where is VosCast located?
We have our SHOUTcast and Auto DJ servers located in datacentres in the US, the UK and the Netherlands.
VosCast is a Canadian business.
Author: Bryan
Last update: 2013-07-17 12:53
Music Licensing and Royalties
Listed below are links to sites related to radio licensing for various regions.
The following information should only be used for reference, and not be interpreted as legal advice.
1. United States
SoundExchange
BMI
ASCAP
2. Canada
SOCAN
3. Germany
SACEM
5. United Kingdom
Buma/Stemra
Please note that VosCast doesn't provide
any form of content licensing or coverage for royalties. It is your
responsibility to obtain any licences relevant for your country and
content.
More information can be found in our terms of service, located at http://voscast.com/terms/.
Author: Bryan
Last update: 2012-01-19 05:39
What's the difference between different plans and bitrates?
The bitrate of your plan determines two things:
The bandwidth used to stream to your server, and the bandwidth used to listen.
For most places, this bandwidth used is trivial. Listening on devices with low bandwidth may experience problems buffering audio at higher bitrates.
The quality of audio
The lower the bitrate, the less data that is sent to the listener and the lower quality of audio received. At lower bitrates, music will lose its fidelity and start to sound distorted. As an example, we have encoded a piece of music to each of the bitrates we offer. We’ve encoded the music in MP3 format as it’s by far the most commonly used format.
48 kbps
64 kbps
96 kbps
128 kbps
192 kbps
256 kbps
320 kbps
Author: Bryan
Last update: 2020-10-13 22:05
Mobile Devices
iOS: Listening with Radio Lite
This guide was made using a 3g iPod Touch. Later iPods, iPhones and iPads will work in a very similar way. Radio Lite is the free version of Radio, a paid app on the App Store. The free version contains all the features you require to listen, but it does have adverts.
1. Install Radio Lite
You can find it in the App Store on your device by searching for "Radio Lite" or viewing it in iTunes here.
2. Launch the app.
3. Tab the Stream icon
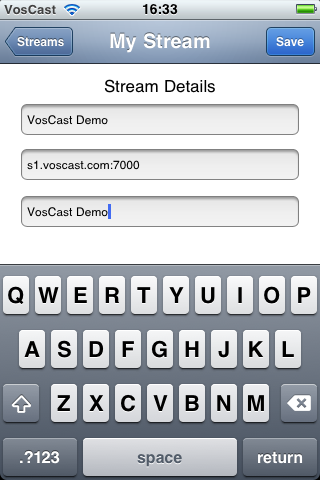
4. Tab the + button

5. Enter your Steam Details
The Station Name and Description fields are for your record only, they don't need to match the server's actual details.
Your Station URL should be the hostname and port only, do not include the protocol (i.e. http://).
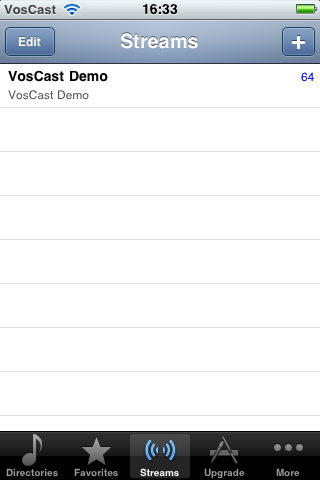
6. Tap the blue Save button and your station will be listed on the Streams page
7. Tap the hollow star to add your station to your favourites
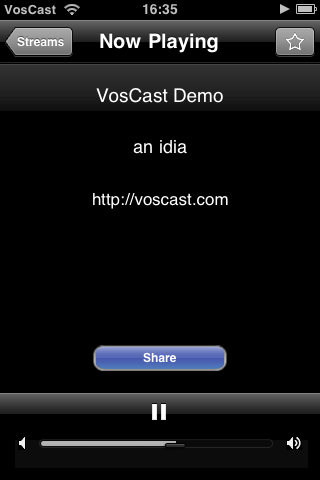
8. Your station will now be saved in your favourites

9. Radio Lite intergrates with the iPod music player
You can continue to listen with Radio Lite in the background and use your iPod controls to pause the stream.
Author: Bryan
Last update: 2011-05-18 19:22
How can I listen on a mobile device?
iOS
iOS has poor native support listening to SHOUTcast stations. While you can listen in iOS's Safari browser, there is no OS integration. Using one of these apps will mean you can listen in the background and control playback with iOS's media controls.
- All Radio
- RADYO
- TuneIn Radio - Only if you've added your server to TuneIn's directory.
Android
- ServeStream
- XiiaLive
- TuneIn Radio - Only if you've added your server to TuneIn's directory.
BlackBerry
Alternatively, most BlackBerries should be able to directly open and stream the .pls playlist file.
Windows Phone 7, 7.5 and/or 8
Author: Bryan
Last update: 2019-02-05 20:04
Using SHOUTcast » Connection Issues
Winamp gets stuck on "Cipher Response Received"
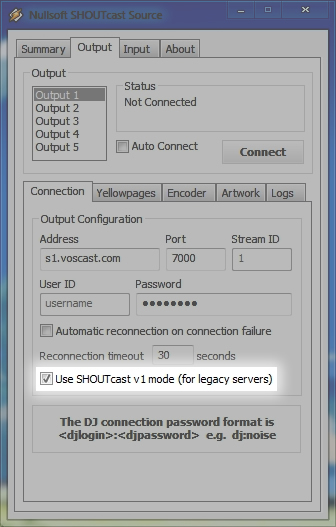
All VosCast servers currently run SHOUTcast 1.9.8, which requires the Nullsoft SHOUTcast Source to be running in v1 mode. "Use SHOUTcast v1 mode (for legacy servers)" must be set to on at all times, otherwise the encoder will get stuck on "Cipher Response Received".
Author: Bryan
Last update: 2011-07-04 17:29
Winamp is disconnected after a few minutes of streaming.
Some older versions of the Nullsoft SHOUTcast Source DPS plugin have a bug that will cause disconnection after streaming for a certain period of time. This can be fixed by updating to the latest version of the plugin.
The current version as of writing (11th July 2013) is 2.3.2 which can be downloaded here:
http://download.nullsoft.com/shoutcast/tools/shoutcast-dsp-2-3-2-windows.exe
Author: Bryan
Last update: 2013-07-17 12:52
My encoder won't connect
Common causes for this include:
Another DJ or Auto DJ is already connected.
SHOUTcast can only have a single DJ connected at any one time. You can check if another DJ is connected by going to the overview page of your account and clicking the link directly under "Full Server Address" to access your server DNAS status page.
A DJ is connected

No DJ connected

If our Auto DJ is connected, you can click "Auto DJ" from the menu on the left and then "Stop Auto DJ" to disconnect our Auto DJ.
The connection to the server is blocked by a firewall or filter
Many school or workplace networks block or filter traffic to non-standard ports, if you are on such a network, provide your IT administrator with the address and port of your server and ask if it's been blocked.
Author: Bryan
Last update: 2013-07-17 12:51